Spring Boot Actuator
- Spring Boot Actuator는 애플리케이션의 상태 및 메트릭 정보를 제공하는 다양한 REST 엔드포인트를 제공
- 대표적인 엔드포인트 : /actuator/health, /actuator/metrics, /actuator/info 등
메트릭(Metric) 정보란?
- 애플리케이션의 성능 및 동작 상태를 수치로 표현한 데이터
- 시스템이 어떻게 동작하고 있는지를 숫자로 보여주는 정보
주요 메트릭 종류
| jvm.memory.used | JVM이 현재 사용 중인 메모리 양 |
| jvm.gc.pause | Garbage Collection이 걸린 시간 |
| process.cpu.usage | 애플리케이션이 사용하는 CPU 비율 |
| system.cpu.usage | 전체 시스템에서 사용 중인 CPU 비율 |
| http.server.requests | HTTP 요청 수, 처리 시간, 상태 코드 등 |
| tomcat.sessions.active.current | 현재 활성화된 세션 수 (톰캣 기반) |
| logback.events | 로깅 이벤트 수 (info, error 등 로그의 수) |
예시
Actuator에서 제공하는 /actuator/metrics/jvm.memory.used 엔드포인트에 요청을 보내면, JVM 메모리 사용량에 대한 JSON 형식의 메트릭 데이터를 확인할 수 있다.
{
  "name": "jvm.memory.used",
  "measurements": [
    {
      "statistic": "VALUE",
      "value": 536870912
    }
  ],
  "availableTags": [
    {
      "tag": "area",
      "values": ["heap", "nonheap"]
    },
    {
      "tag": "id",
      "values": ["PS Eden Space", "PS Survivor Space"]
    }
  ]
}
위의 데이터는 JVM에서 heap 영역의 Eden Space가 약 512MB 사용 중이라는 의미이다.
용도
- 모니터링: 시스템이 정상적으로 동작하고 있는지 확인
- 알림/경고 설정: 특정 메트릭이 임계치를 넘으면 알림 전송
- 성능 튜닝: CPU/메모리 사용량 분석을 통한 최적화
- 대시보드: Prometheus + Grafana 같은 툴과 연동해서 시각화 가능
Prometheus
- 원래 SoundCloud에서 개발된 오픈 소스 시스템 모니터링 및 알림 도구, 현재는 독립적으로 오픈소스로 운영됨
- 주로 애플리케이션, 서버, 컨테이너의 성능 상태를 실시간으로 모니터링하는 데 사용됨
- Spring Boot Actuator 같은 서비스에서 수집한 메트릭 정보를 저장, 분석, 시각화할 수 있게 함
- 시계열 데이터(Time-series data)를 수집하고 쿼리할 수 있는 기능이 강력함
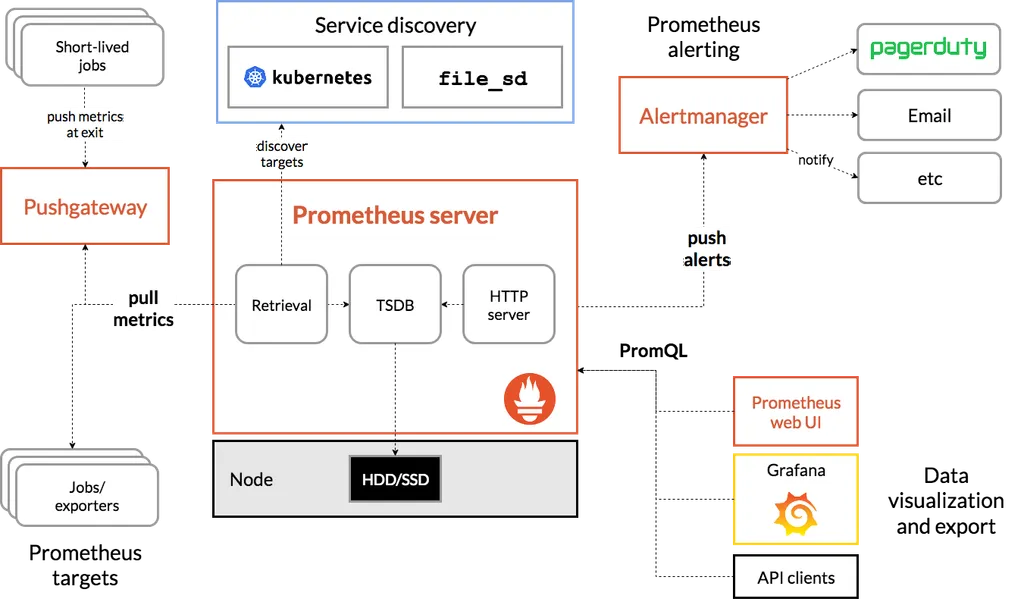
구성요소
구성 요소 설명
| Prometheus 서버 | 메트릭 데이터를 주기적으로 수집하고 저장 |
| Exporter | 메트릭 정보를 제공하는 대상 (예: Spring Boot Actuator) |
| Push Gateway | 푸시 방식으로 메트릭을 전달할 수 있도록 해주는 중간 지점 (옵션) |
| Alertmanager | 조건을 만족할 때 이메일, 슬랙 등으로 알림 |
| Grafana | Prometheus와 연동해서 데이터를 예쁜 대시보드로 시각화 가능 |
[참고] 연동 가능한 툴
툴 설명
| Grafana | Prometheus와 연동해 수집된 메트릭을 대시보드 형태로 시각화할 수 있는 오픈소스 도구 |
작동 방식
- Prometheus가 메트릭 데이터를 제공하는 곳(target)에 주기적으로 접근
- 예: http://localhost:8080/actuator/prometheus
- 메트릭 정보를 수집해서 내부 DB에 저장
- 저장된 데이터를 쿼리 언어로 분석 (PromQL)
- 알림을 설정하거나 Grafana로 시각화
예시
Spring Boot에서 spring-boot-actuator와 micrometer-registry-prometheus를 설정하면
/actuator/prometheus 경로에서 다음과 같은 데이터가 제공된다.
jvm_memory_used_bytes{area="heap",id="PS Eden Space"} 1.024e+08
http_server_requests_seconds_count{method="GET",uri="/api/user"} 500
Prometheus는 이러한 데이터를 수집해서 다음과 같이 사용할 수 있다.
- 시간별 그래프를 그리기
- 평균 요청 시간 계산하기
- 특정 조건 만족 시 경고 메시지 보내기 등
Spring Boot Actuator와 Prometheus( + Micrometer)
핵심 관계 요약
[Spring Boot App]
    │
    └── Actuator
           │
           └── Micrometer (메트릭 수집기)
                   │
                   └── Prometheus Registry (형식 맞춤)
                           ↓
[Prometheus 서버가 /actuator/prometheus 엔드포인트를 긁어서 수집]
Spring Boot Actuator
- Spring Boot에서 제공하는 운영용 진단 기능 모음
- /actuator/health, /actuator/metrics, /actuator/env 등 다양한 엔드포인트 제공
- 기본적으로 메트릭 정보를 수집하지만, 사람이 보기 좋은 JSON 형태로만 제공됨
- 내부적으로는 Micrometer를 사용해서 메트릭을 수집함
➡️ 하지만 이 데이터는 저장하거나 분석하거나 그래프화하지 않음
Micrometer
- Micrometer는 Spring Boot Actuator에서 사용하는 메트릭 수집 라이브러리
- Prometheus와 연동하기 위해 Prometheus 전용 registry를 추가해야 함
- JVM 메모리, GC 시간, HTTP 요청 수, DB 연결 수 등 다양한 항목을 수집함
- 다양한 백엔드 시스템(Prometheus, Graphite, New Relic, Datadog 등)에 데이터를 넘길 수 있음
➡️ Micrometer 자체는 수집만 하고 저장이나 시각화는 하지 않음
micrometer-registry-prometheus
- Micrometer가 Prometheus가 읽을 수 있는 형식으로 데이터를 노출해주는 라이브러리
- 설정하면 /actuator/prometheus 엔드포인트가 생성됨
- 내용은 Prometheus 서버가 주기적으로 읽어갈 수 있는 형식 (텍스트)
예: /actuator/metrics는 응답 결과가 JSON이지만
/actuator/prometheus는 Prometheus 포맷 으로 생성된다.
(ex: http_server_requests_seconds_count{method="GET"} 512)
Grafana
- Grafana는 메트릭 데이터를 시각화해주는 오픈소스 대시보드 도구
- 시계열 데이터베이스(TSDB) 데이터를 통찰력 있는 그래프와 시각화로 전환하는 도구를 제공
주요 특징
- 다양한 데이터 소스 지원
- Prometheus, Elasticsearch, MySQL, PostgreSQL 등 여러 데이터 소스를 연결할 수 있음
- 특히 Prometheus와 함께 쓰는 경우가 많음
- 실시간 대시보드 구성
- 메트릭 값을 그래프, 테이블, 게이지 등 다양한 형태로 시각화 가능
- 대시보드를 드래그 앤 드롭으로 자유롭게 구성할 수 있음
- 쿼리 언어 지원
- Prometheus와 연동할 경우 PromQL 사용
- SQL 기반 데이터소스는 SQL로 쿼리 가능
- 알림(Alerts) 기능
- 특정 조건에 따라 슬랙, 이메일 등으로 알림 전송 가능
- 예: CPU가 일정 수치 이상이면 경고 알림
- 공유와 협업
- 만든 대시보드를 URL로 공유하거나 PDF로 내보내기 가능
- 팀 단위로 대시보드 운영할 수 있음
모니터링 시스템 아키텍처

Spring Application에 설정하기
의존성 추가
dependencies {
    implementation 'org.springframework.boot:spring-boot-starter-actuator'
    implementation 'io.micrometer:micrometer-registry-prometheus'
}
libs.versions.toml 파일을 이용하여 관리하는 경우
[versions]
micrometer-registry-prometheus = "1.14.6"

[bundles]
# 필요한 프로젝트에 추가하기

[libraries]
spring-boot-starter-actuator = { module = "org.springframework.boot:spring-boot-starter-actuator", version.ref = "spring-boot" }
micrometer-registry-prometheus = { module = "io.micrometer:micrometer-registry-prometheus", version.ref = "micrometer-registry-prometheus" }
멀티 모듈 프로젝트의 경우
- 의존성 추가 위치는 → 애플리케이션 실행과 관련된 모듈
- 즉, Spring Boot Application (@SpringBootApplication)이 위치한 모듈 → actuator의 메트릭을 노출하고, 실행되는 주체
Actuator 호출 테스트
로컬호스트 기준으로, localhost:8080/actuator로 접속하면 Spring Boot Actuator가 기본적으로 제공하고 있는 Endpoint를 알 수 있다.
- Spring Security 사용 시 /actuator/prometheus 경로를 허용해야 한다.

yml 파일 설정
- yml에 exposure 설정을 변경하거나 추가하면서, 다양한 actuator endpoint를 접근할 수 있도록 열어줄 수 있다.
management:
  endpoints:
    web:
      exposure:
        include: prometheus
- 어떤 Actuator 엔드포인트를 HTTP로 외부에 노출할지 설정
- 이 설정이 없다면, 기본적으로는 health, info만 노출됨
- 여기서 prometheus를 포함시켰기 때문에 http://localhost:8080/actuator/prometheus 주소로 Prometheus 메트릭을 외부에서 접근 가능
- 즉, 엔드포인트를 열어주는 역할
management:
  prometheus:
    metrics:
      export:
        enabled: true
- Micrometer에서 Prometheus용 메트릭 export 기능을 활성화
- 이 설정이 있어야 Spring Boot 애플리케이션이 Prometheus가 읽을 수 있는 메트릭 형식으로 데이터를 준비함
- 즉, Prometheus 형식으로 메트릭 데이터를 만들도록 설정하는 역할
정리
management:
  endpoints:
    web:
      exposure:
        include: prometheus

  prometheus:
    metrics:
      export:
        enabled: true
위의 설정을 추가하고 http://localhost:8080/actuator/prometheus 호출 시 Prometheus가 읽을 수 있는 메트릭 형식으로 데이터가 호출됨
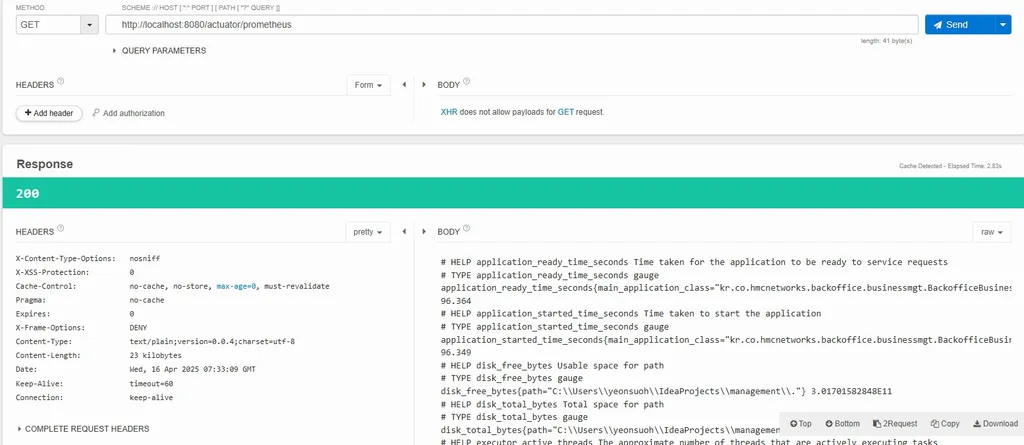
수집되고 있는 주요 메트릭
운영 정보 메트릭 이름 예시
| CPU 사용률 | process_cpu_usage, system_cpu_usage |
| 메모리 사용량 | jvm_memory_used_bytes, jvm_memory_max_bytes |
| GC 활동 | jvm_gc_memory_allocated_bytes_total 등 |
| 스레드 수 | jvm_threads_live_threads, jvm_threads_states_threads |
| DB 커넥션 | hikaricp_connections_*, jdbc_connections_* |
| 애플리케이션 부팅 시간 | application_started_time_seconds |
| HTTP 요청 처리 | http_server_requests_* |
| 로그 수 | logback_events_total |
| Spring Security 요청 처리 | spring_security_* |
Docker
- 가상 실행 환경을 제공해주는 오픈소스 플랫폼
- 도커를 사용하는 이유 : Prometheus와 Grafana 같은 모니터링 도구를 간편하게 실행하고 연결하기 위함
특징 설명
| 설치 간편 | Prometheus나 Grafana는 바이너리 다운로드보다 Docker 이미지로 띄우는 게 훨씬 빠름 |
| 버전 관리 쉬움 | docker-compose.yml에서 버전 명시 가능 |
| 시스템 환경 오염 없음 | 설치 없이 컨테이너만 실행 |
| 여러 서비스 연결 용이 | Spring App, Prometheus, Grafana를 하나의 compose로 관리 가능 |
Prometheus 설정
- Prometheus를 통해 서버 로그를 수집해와야 하므로, 타겟이 되는 서버와 관련된 정보를 저장하는 yml파일이 필요하다. 이를 prometheus.yml로 서버 내에 생성한다.
- 이렇게 생성한 파일은 docker-compose를 통해 Prometheus를 실행할 때, 해당 yml파일을 이용하도록 설정한다.
prometheus.yml (각 프로젝트별 적용한 예시)
scrape_configs:
  - job_name: 'project-A-api'
    metrics_path: '/actuator/prometheus'
    scrape_interval: 10s
    static_configs:
      - targets: ['100.200.100.100:8080']

  - job_name: 'project-B-api'
    metrics_path: '/actuator/prometheus'
    scrape_interval: 10s
    static_configs:
      - targets: ['100.200.100.100:9090']
⚠️ prometheus.yml 로컬 테스트용 설정⚠️
(Prometheus가 Docker 컨테이너 안에서 실행 중 & Spring Boot는 로컬에서 실행중일 때)
scrape_configs:
  - job_name: 'project-A-api'
    metrics_path: '/actuator/prometheus'
    scrape_interval: 10s
    static_configs:
      - targets: ['host.docker.internal:8080']

  - job_name: 'project-B-api'
    metrics_path: '/actuator/prometheus'
    scrape_interval: 10s
    static_configs:
- targets: ['host.docker.internal:9090']- 컨테이너 입장에선 localhost는 자기 자신이므로, 컨테이너 안에서 localhost:8080을 찍으면 Spring Boot 서버를 찾지 못할 수 있다.
- 이 경우에는 보통 host.docker.internal:8080 사용 (Mac/Windows)
- 리눅스일 경우엔 --network=host 쓰거나, IP 직접 지정 필요
Docker Compose 설정
docker-compose.yml
version: '3.8'

services:
  prometheus:
    image: prom/prometheus:latest
    container_name: prometheus
    user: "$UID:$GID"
    ports:
      - "19090:9090" # 외부 : 내부
    volumes:
      - ./prometheus.yml:/etc/prometheus/prometheus.yml
      - ./prometheus-data:/prometheus

  grafana:
    image: grafana/grafana:latest
    container_name: grafana
    user: "$UID:$GID"
    ports:
      - "3000:3000"
    volumes:
      - ./grafana-data:/var/lib/grafana
    depends_on:
- prometheus- (외부 9090 포트 사용중이라 19090으로 설정하였음)
- 설정 파일 마운트 :
- prometheus.yml: 타겟 서버 정보 포함 (필수)
- prometheus-data: 수집된 메트릭 데이터를 저장할 로컬 디렉토리 (데이터 유실 방지)
- volume mount를 해야하는 이유
- 도커 컨테이너를 삭제 후 재실행하는 상황이 발생하게 된다면, 도커 컨테이너 내에서 저장되고 있던 로그 데이터들이 휘발되는 상황이 발생할 수 있으므로 서버의 특정 경로와 연결시켜 로그 데이터들이 유실되는 상황을 방지해야 한다.
- 여기서 "$UID:$GID”는 echo $UID, id -g로 조회 후 실제 값을 넣어주어야 한다.
- Grafana는 Prometheus 실행 이후 시작되도록 설정 (종속 관계 정의)
- 디렉토리 구조 예시
project-root/
├── docker-compose.yml
├── prometheus.yml
├── prometheus-data/       # Prometheus 데이터 저장
└── grafana-data/          # Grafana 데이터 저장
디렉토리 생성
mkdir ~/monitoring
cd ~/monitoring
- 여기에 파일들 생성
- docker-compose.yml
- prometheus.yml
- (grafana-data/, prometheus-data/는 자동 생성됨)
Docker compose 실행 방법
docker-compose up -d
- 백그라운드 모드로 Prometheus와 Grafana 컨테이너 실행
- 실행 후 외부 포트로 정의한 포트에서 웹 UI에 접속 가능하다.
- Prometheus: http://{Docker Container 실행 중인 Host 공인 IP}:19090
- Grafana: http://{Docker Container 실행 중인 Host 공인 IP}localhost:3000
- 주의할 점 : docker-compose.yml이 있는 디렉토리에서 실행해야 함
로컬 테스트
[참고] WSL-Ubuntu에서 테스트하기
- docker desktop 최신 버전으로 업데이트
- Settings > Resources > WSL integrationUbuntu가 비활성화 되어있는데, 활성화한 후 Apply & restart 클릭
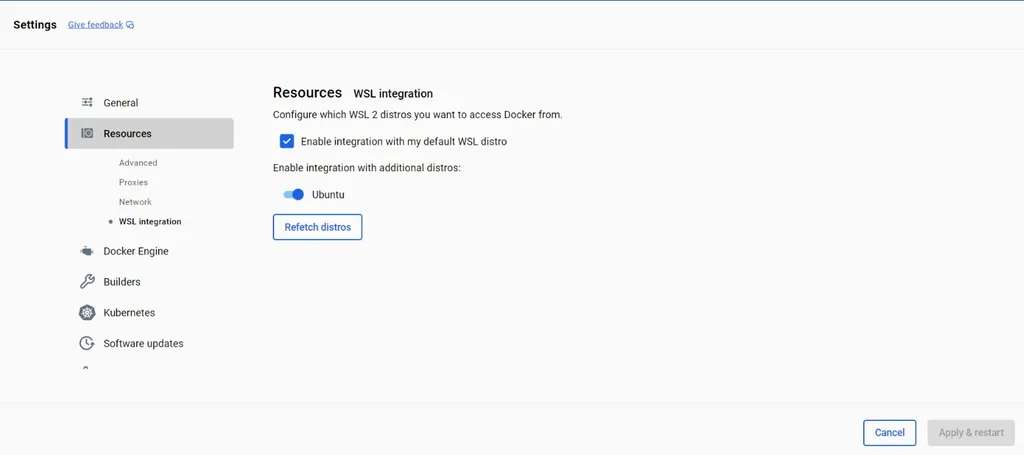
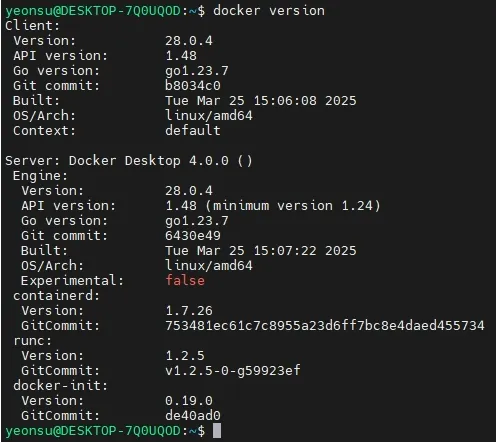
위 설정 없이는 다음처럼 WSL-Ubuntu 터미널에서 docker version 명령어 실행 시 ”The command ‘docker’ could not be found in this WSL 2 distro” 에러가 난다. 하지만 위 설정 후 다시 docker version 명령 실행 시 docker Client의 버전이 뜨는 것을 확인할 수 있다.

다만 docker Server의 버전을 보여주지 않으며 permission denied 에러가 뜬다. 이를 해결하기 위하여 사용자를 docker 그룹에 추가해야 한다.
getent group docker # docker 그룹이 존재하는지 확인
sudo groupadd docker # 없으면 이 명령어로 만들기
sudo usermod -aG docker $USER # 현재 유저를 docker 그룹에 추가
# 설정 반영을 위해 터미널 다시 시작

도커 그룹 설정 완료 시 permission 에러가 해결된다.
로컬에서 테스트 절차
- 프로젝트에 의존성 추가, security permit all 설정
- /monitoring 이라는 경로 만들고 내부로 이동 (mkdir -p ~/monitoring && cd ~/monitoring)
- prometheus.yml 파일 생성 (vim prometheus.yml)
- docker-compose.yml 파일 생성 (vim docker-compose.yml)
- 테스트 대상 서버 로컬에서 실행
- docker-compose 실행 (docker-compose up -d)
Prometheus 웹 UI 확인
브라우저에서 http://localhost:19090 → prometheus gui 페이지 확인

Status > Target health 에서 Spring Boot 애플리케이션의 Status가 UP 인지 확인할 수 있다.

Grafana 웹 UI 확인
- 웹브라우저에서 http://localhost:3000 접속
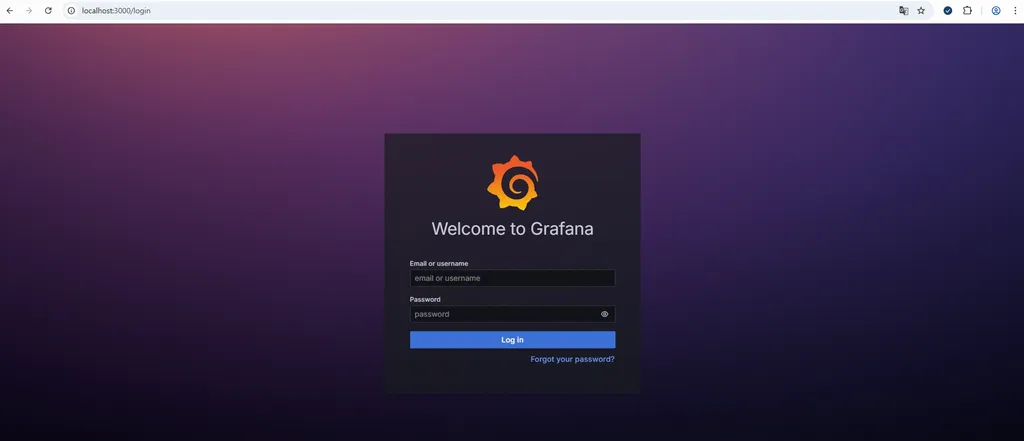
- 기본 로그인 정보 :
- ID: admin
- PW: admin
- 로그인 시 비밀번호 변경 안내가 뜨게 된다.
- 로그인을 마치면 다음과 같은 화면이 나온다.

Grafana에서 Prometheus 데이터 소스 등록
- Connections > Data sources > Add data source 클릭 후 prometheus를 클릭한다.
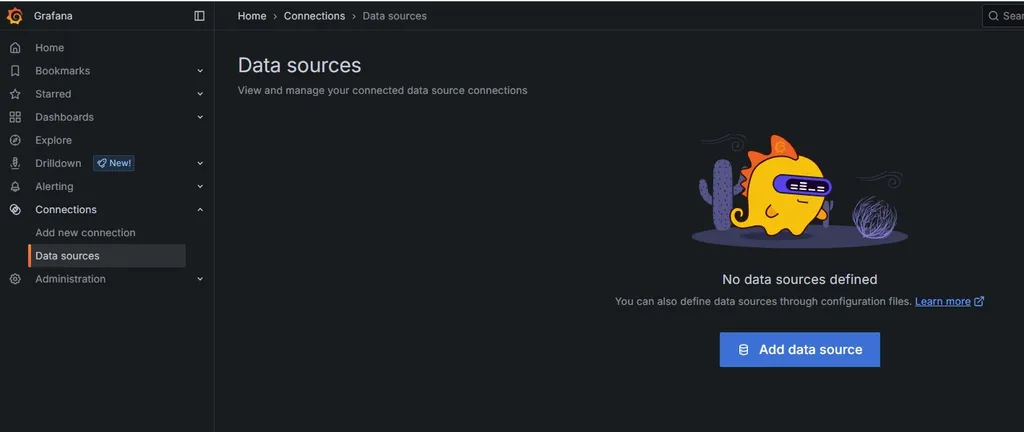

다음 화면에서 Connection - Prometheus server URL을 다음과 같이 입력한다.
- URL: http://prometheus:9090
- URL이 prometheus인 이유?
- Grafana도 Docker 컨테이너이다.
- Grafana에서 설정하는 Prometheus URL은 Grafana 컨테이너 → Prometheus 컨테이너 내부 통신을 말한다.
- 같은 Docker 네트워크 내에 있는 다른 컨테이너는 컨테이너 이름으로 접근할 수 있다.
- URL이 prometheus인 이유?

그 후 아래에 있는 Save & test 버튼을 누른다.

연결이 잘 되었다는 메시지를 확인한다.
Dashboard import - Spring Boot 3.x Statistics (19004)
해당 템플릿의 특징
항목 설명
| 전체 관측 범위 | JVM, HTTP, HikariCP, Threads, Disk 등 애플리케이션 전반의 메트릭을 종합적으로 시각화 |
| Spring Actuator 메트릭 친화적 | micrometer-registry-prometheus 연동 기준의 Spring Boot 3.x 메트릭에 맞춰져 있음 |
| HTTP 상태 코드, 에러 응답률 포함 | 에러 모니터링까지 포함돼 있어 “오류 추적”에 유리 |
| 애플리케이션 중심 설계 | 단순 JVM 레벨이 아니라 Spring Boot 자체를 운영하는 데 필요한 모든 지표 제공 |
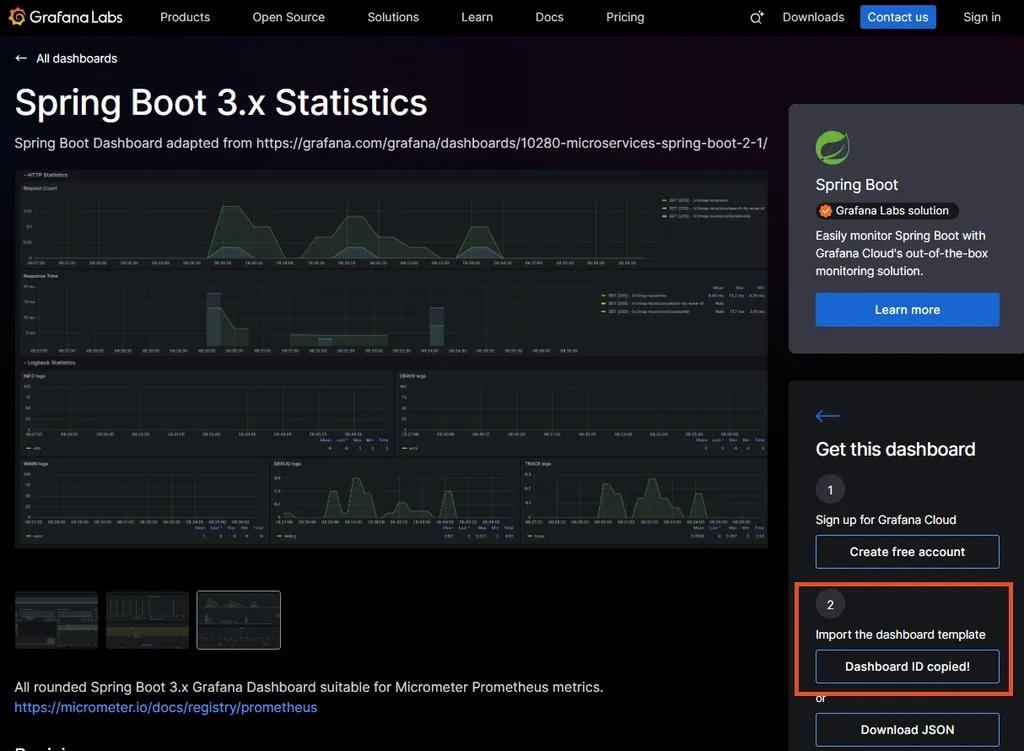
템플릿을 선택한 후 Dashboard ID를 복사한다. (19004)

Grafana의 Dashboards 탭에서 New > import를 클릭한다.
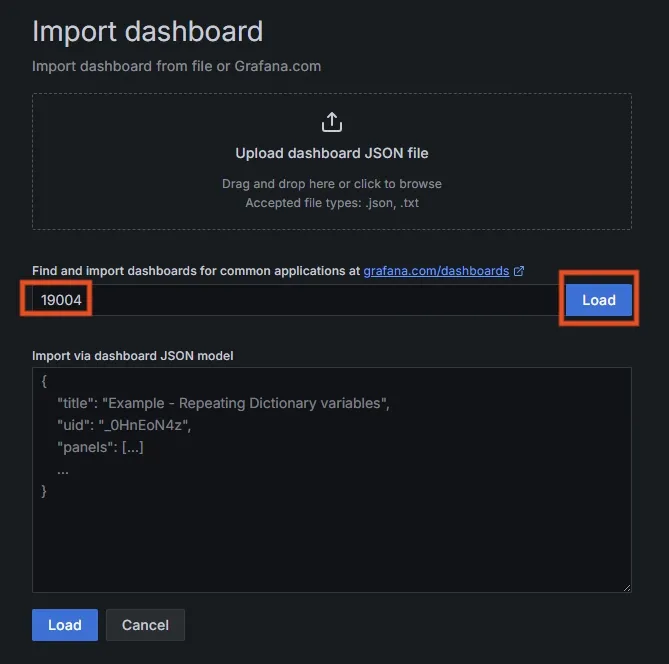
복사한 ID를 입력하고 Load를 클릭한다.

그 후 나오는 화면에서 Prometheus 부분에서 위에서 설정한 data source인 prometheus를 선택하고, import를 클릭한다.

- 생성 완료 시 위와 같은 대시보드 화면을 볼 수 있다.
- 위의 Instance 설정을 통하여 prometheus.yml에 설정한 인스턴스들을 바꿔가며 조회할 수 있다.
운영 환경 적용
적용 전 보안 관련 고려 사항
- 해당 모니터링 서비스는 모두가 접근하면 안되기에 접근 제한을 걸어두어야 함
- Whitelist 방식으로 특정 IP만 접근이 가능하도록 하여 보안성을 높일 수 있음
/actuator/** 공개는 위험
- /actuator는 단순히 /prometheus만 있는 게 아니다.
- 기본적으로 헬스체크, 환경정보, 로그레벨 조작 등 민감한 정보에 접근이 가능하다.
- 예시
- /actuator/env → 환경 변수 정보 노출 (DB, 인증키 위험)
- /actuator/beans → 전체 빈 정보 노출
- /actuator/loggers → 실시간 로그레벨 조작 가능
- 이런 정보는 공격자에게 아주 유용한 인사이트가 될 수 있다.
IP Whitelist + 최소화된 endpoint 노출
- 보안적으로 허용된 IP에게만 /actuator/prometheus 공개
- docker로 Prometheus를 띄우는 인스턴스의 IP를 접근 허용 IP로 설정하면 된다.
- 실제로 Prometheus가 스크래핑 요청(GET /actuator/prometheus)을 날릴 주체이기 때문이다.
- DockerIp의 경우 하드코딩 하지 않고, yml 파일로 관리하기
- [예시]
monitor:
  allowed-ip: 000.000.000.00 # docker 공인 ip
  prometheus-path: /actuator/prometheus
SecurityConfig 클래스 내에 설정 추가, private fun 생성
- .authorizeHttpRequests {} 안에 추가
                    .requestMatchers(authMonitorProperties.prometheusPath)
                    .access(ipRestrictor(authMonitorProperties.allowedIp))
- private function 생성
    private fun ipRestrictor(allowedIp: String): AuthorizationManager<RequestAuthorizationContext> {
        val log = LoggerFactory.getLogger("IpRestrictor")
        return AuthorizationManager { _, context ->
            val remoteIp = context.request.remoteAddr
            val isAllowed = remoteIp == allowedIp

            if (!isAllowed) {
                log.warn("[IP 검증 실패] remoteIp=$remoteIp, allowed=$allowedIp")
            }

            AuthorizationDecision(isAllowed)
        }
    }
docker instance 적용 중 트러블 슈팅
1. docker-compose up -d로 해보았을 때 prometheus, grafana 컨테이너가 뜨지 않음
- 꺼진 컨테이너 보기
docker ps -a

- prometheus, grafana 이름의 컨테이너가 Exited 상태로 있음
- 에러 로그 확인
docker logs <컨테이너ID 또는 이름>
docker logs prometheus
backend@hmc_server_02:~/docker/grafana$ docker logs prometheus
time=2025-04-23T02:26:12.043Z level=INFO source=main.go:640 msg="No time or size retention was set so using the default time retention" duration=15d
time=2025-04-23T02:26:12.043Z level=INFO source=main.go:687 msg="Starting Prometheus Server" mode=server version="(version=3.3.0, branch=HEAD, revision=3c49e69330ceee9c587a1d994c78535695edff16)"
time=2025-04-23T02:26:12.043Z level=INFO source=main.go:692 msg="operational information" build_context="(go=go1.24.1, platform=linux/amd64, user=root@b362765c931d, date=20250415-13:32:00, tags=netgo,builtinassets,stringlabels)" host_details="(Linux 4.15.0-197-generic #208-Ubuntu SMP Tue Nov 1 17:23:37 UTC 2022 x86_64 b2f72aecfe35 (none))" fd_limits="(soft=1048576, hard=1048576)" vm_limits="(soft=unlimited, hard=unlimited)"
time=2025-04-23T02:26:12.054Z level=INFO source=main.go:768 msg="Leaving GOMAXPROCS=16: CPU quota undefined" component=automaxprocs
time=2025-04-23T02:26:12.061Z level=ERROR source=query_logger.go:113 msg="Error opening query log file" component=activeQueryTracker file=/prometheus/queries.active err="open /prometheus/queries.active: permission denied"
panic: Unable to create mmap-ed active query log

goroutine 1 [running]:
github.com/prometheus/prometheus/promql.NewActiveQueryTracker({0x7ffde2ae8f7d, 0xb}, 0x14, 0xc000054690)
        /app/promql/query_logger.go:145 +0x345
main.main()
        /app/cmd/prometheus/main.go:795 +0x813d
- 원인 정리
Error opening query log file
component=activeQueryTracker file=/prometheus/queries.active
err="open /prometheus/queries.active: permission denied"

panic: Unable to create mmap-ed active query log

/prometheus 디렉토리는 Prometheus 컨테이너 내부에서 **쓰기(write)**를 하려고 하는데, 지금 연동된 **호스트 디렉토리의 권한이 부족해서 실패함**
- 원인은 ‘docker-compose up -d’를 할 때 볼륨 마운트를 위하여 생성되는 디렉토리가 root 권한으로 생성되는데, 그 디렉토리에 현재 사용자(backend)가 쓰기 권한이 부족하여 생기는 것이었다.
backend@hmc_server_02:~/docker/grafana$ ls -ld ./prometheus-data ./grafana-data
drwxr-xr-x 2 root root 4096 Apr 23 11:59 ./grafana-data
drwxr-xr-x 2 root root 4096 Apr 23 11:59 ./prometheus-data
backend@hmc_server_02:~/docker/grafana$ id
uid=1009(backend) gid=1009(backend) groups=1009(backend),4(adm),27(sudo),999(docker)
backend@hmc_server_02:~/docker/grafana$
[참고] https://sweethoneybee.tistory.com/28
- 해결 방법
- root 권한으로 생성된 기존 디렉토리 삭제
rm -rf ./prometheus-data ./grafana-data
- 현재 계정으로 디렉토리 다시 생성
mkdir ./prometheus-data ./grafana-data
- 권한 확인
ls -ld ./prometheus-data ./grafana-data
결과에 권한이 backend로 나오면 성공
backend@hmc_server_02:~/docker/grafana$ ls -ld ./prometheus-data ./grafana-data
drwxrwxr-x 6 backend backend 4096 Apr 23 12:03 ./grafana-data
drwxrwxr-x 4 backend backend 4096 Apr 23 12:03 ./prometheus-data
- 컨테이너 재시작
docker-compose down
docker-compose up -d
- 컨테이너가 잘 실행되었다.

2. 컨테이너가 실행되었지만 prometheus, grafana 대시보드에 접근 불가
-> 포트포워딩, 방화벽 관련 이슈로 관리자에게 요청하여 해결하였다.
[참고]
https://velog.io/@hongjunland/Spring-Boot-Spring-Boot-Actuator-Grafana-Prometheus-%EC%97%B0%EA%B2%B0
[Spring Boot] Spring Boot Actuator, Grafana & Prometheus 모니터링 구축 및 연결
애플리케이션의 성능 테스트를 하는데, 모니터링 및 시각화 도구를 사용해보고자 했습니다. 많은 사람들이 사용하는 Spring Boot Actuator , Prometheus, Grafana 의 사용 방법에 대해 기록하고자 합니다.
velog.io
[모니터링] Spring Boot + Prometheus + Grafana 도입하기
모니터링 도입기
velog.io
https://sweethoneybee.tistory.com/28
0915 Docker volume permission 문제(해결완료)
Docker volume permission 문제 해결방법 (이 문서는 아티클을 참고해서 번역하고 정리한 글입니다.) (우리 프로젝트에 적용한 사례도 있습니다) 프로젝트를 진행하면서 도커로 컨테이너를 띄웠는데 log
sweethoneybee.tistory.com
'Spring' 카테고리의 다른 글
| pc ↔ 모바일 전환 시 일회용 토큰을 이용하여 로그인 기능 유지하기 (1) | 2025.07.06 |
|---|---|
| Prometheus + Grafana instance 별칭 설정하기 (0) | 2025.06.09 |
| JpaSystemException: Could not extract column [6] from JDBC ResultSet [MONTH] 오류 해결 (1) | 2025.02.18 |
| 비밀번호 없이 회원가입, 로그인 구현 (kotlin + spring boot) (0) | 2025.02.08 |
| 클린 스프링: 스프링 개발자를 위한 클린 코드 전략 - 이일민(토비) (28) | 2024.11.18 |

