실습 환경 배포
실습 환경 : Control Plane 1대 + Worker Node 1대로 구성
Windows Docker 설치 (WSL2) - (+Kind)
# Windows WSL2 (Ubuntu) - PowerShell / CMD (관리자 권한)
dism.exe /online /enable-feature /featurename:Microsoft-Windows-Subsystem-Linux /all /norestart
dism.exe /online /enable-feature /featurename:VirtualMachinePlatform /all /norestart
wsl --list -o
wsl --install -d ubuntu

# WSL2 Ubuntu
sudo snap install docker
sudo groupadd docker
sudo usermod -aG docker $USER
docker --version

# Kind 설치
[ $(uname -m) = x86_64 ] && curl -Lo ./kind <https://kind.sigs.k8s.io/dl/v0.27.0/kind-linux-amd64>
sudo chmod +x ./kind
sudo mv ./kind /usr/local/bin/kind

# Kind Cluster 생성
kind create cluster

# kubectl 설치
sudo snap install kubectl --classic
kubectl get pods -A

# Krew 설치
wget <https://github.com/kubernetes-sigs/krew/releases/download/v0.4.5/krew-linux_amd64.tar.gz>
tar zxvf krew-linux_amd64
./krew-linux_amd64 install krew
~/.bashrc >> export PATH="${KREW_ROOT:-$HOME/.krew}/bin:$PATH"
source ~/.bashrc
kubectl krew

# k9s 설치
wget <https://github.com/derailed/k9s/releases/download/v0.50.4/k9s_linux_amd64.deb>
sudo dpkg -i k9s_linux_amd64.deb
sudo apt-get install -f
k9s

# Helm 설치
sudo snap install helm --classic
helm ls
멀티노드 클러스터 with kube-ops-view & Mapping ports - macOS 사용자
윈도우를 사용하지만 강의에서 진행한 macOS용 실습 코드로 따라해보며 트러블 슈팅해보았다.
# '컨트롤플레인, 워커 노드 1대' 클러스터 배포 : 파드에 접속하기 위한 포트 맵핑 설정
cat <<EOT> kind-2node.yaml
kind: Cluster
apiVersion: kind.x-k8s.io/v1alpha4
nodes:
- role: control-plane
- role: worker
extraPortMappings:
- containerPort: 30000
hostPort: 30000
listenAddress: "0.0.0.0" # Optional, defaults to "0.0.0.0"
protocol: tcp # Optional, defaults to tcp
- containerPort: 30001
hostPort: 30001
EOT
kind create cluster --config kind-2node.yaml
# 배포 확인
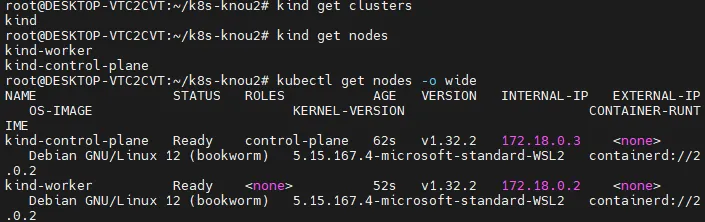
kind get clusters
kind get nodes
# 노드 확인
kubectl get nodes -o wide
# 노드에 Taints 정보 확인
kubectl describe node kind-control-plane | grep Taints
Taints: node-role.kubernetes.io/control-plane:NoSchedule
kubectl describe node kind-worker | grep Taints
Taints: <none>
# 컨테이너 확인 : 컨테이너 갯수, 컨테이너 이름 확인
# kind yaml 에 포트 맵핑 정보 처럼, 자신의 PC 호스트에 30000 포트 접속 시, 워커노드(실제로는 컨테이너)에 TCP 30000 포트로 연결
# 즉, 워커노드에 NodePort TCP 31000 설정 시 자신의 PC 호스트에서 접속 가능!
docker ps
docker port kind-worker
30000/tcp -> 0.0.0.0:30000
30001/tcp -> 0.0.0.0:30001
extraPortMapping 설명
- nodePort → vm의 port를 사용하는 것
- kind는 도커 기반으로 운영됨. 도커의 31000, 31001번 포트를 열어주는 것

control plane은 API 서버나 제어 부분을 담당하고 있다. 따라서 control plane에는 워크노드가 실행되는 파드가 배포되면 안 된다. 그렇게 하도록 Taint를 통해서 명시적으로 지정할 수 있다.


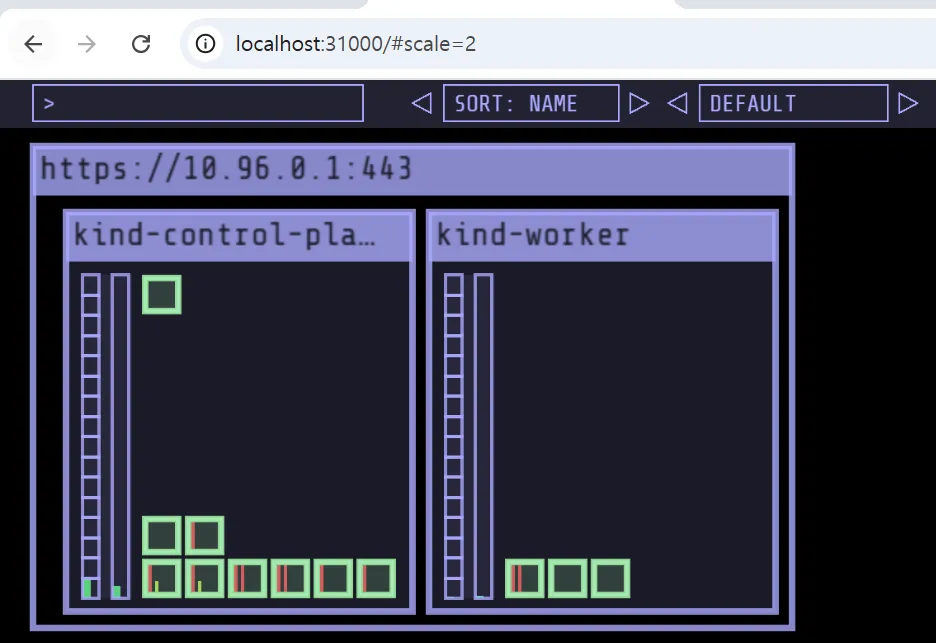
- kube-ops-view
- 쿠버네티스상에서 파드가 배포되는 것을 실시간으로 GUI 환경에서 볼 수 있는 테스트 도구
- helm 설치 후 진행
# kube-ops-view
# helm show values geek-cookbook/kube-ops-view
helm repo add geek-cookbook <https://geek-cookbook.github.io/charts/>
helm install kube-ops-view geek-cookbook/kube-ops-view --version 1.2.2 --set service.main.type=NodePort,service.main.ports.http.nodePort=31000 --set env.TZ="Asia/Seoul" --namespace kube-system

# 설치 확인
kubectl get deploy,pod,svc,ep -n kube-system -l app.kubernetes.io/instance=kube-ops-view

# kube-ops-view 접속 URL 확인 (2 배율)
echo -e  "KUBE-OPS-VIEW URL = http://localhost:31000/#scale=2"
- service → 8080 포트가 31000번 포트와 매핑이 되어있음
- TYPE : NodePort 타입으로 외부의 포트를 열어줌
- 실제로 쿠버네티스 노드의 31000번 포트로 들어가면 컨테이너 kube-ops-view라는 파드 애플리케이션의 8080 포트로 연결이 됨을 확인할 수 있다.
[참고] macOs 사용자용 실습을 Window에서 진행했을 때 - http://localhost:31000/#scale=2 접속 안 될 때

- WSL2 + Docker Desktop 환경에서는 Docker가 WSL2 VM 안에서 돌아가고, Kind 클러스터도 Docker 컨테이너 안에서 돌아가는데, 이 컨테이너 내부에서 매핑된 포트(31000)가 내 PC(윈도우 호스트)에서 바로 접근이 안 된다고 한다.
- 즉 NodePort는 컨테이너 내부에서 잘 열려있지만, 윈도우 PC에서는 그걸 못 잡는다.
- 해결책
⚠️ On Windows + WSL2, extraPortMappings might not work as expected. Use kubectl port-forward as a reliable alternative.
- WSL2에선 port-forward가 공식 해결책이라고 한다. (다음 명령어 실행)
kubectl port-forward -n kube-system service/kube-ops-view 31000:8080

- 테스트 : nginx: NodePort 31001
# 디플로이먼트와 서비스 배포
cat <<EOF | kubectl create -f -
apiVersion: apps/v1
kind: Deployment
metadata:
  name: deploy-websrv
spec:
  replicas: 2
  selector:
    matchLabels:
      app: deploy-websrv
  template:
    metadata:
      labels:
        app: deploy-websrv
    spec:
      terminationGracePeriodSeconds: 0
      containers:
      - name: deploy-websrv
        image: nginx:alpine
        ports:
        - containerPort: 80
---
apiVersion: v1
kind: Service
metadata:
  name: deploy-websrv
spec:
  ports:
    - name: svc-webport
      port: 80
      targetPort: 80
      nodePort: 31001
  selector:
    app: deploy-websrv
  type: NodePort
EOF

# 확인
docker ps
CONTAINER ID   IMAGE                  COMMAND                  CREATED          STATUS          PORTS                                  NAMES
aaf3847e7643   kindest/node:v1.32.2   "/usr/local/bin/entr…"   11 minutes ago   Up 11 minutes   0.0.0.0:31000-31001->31000-31001/tcp   kind-worker
...

kubectl get deploy,svc,ep deploy-websrv
...
NAME                    TYPE       CLUSTER-IP    EXTERNAL-IP   PORT(S)        AGE
service/deploy-websrv   NodePort   10.96.30.19   <none>        80:31001/TCP   57s
...

# 자신의 PC에 호스트 포트 31001 접속 시 쿠버네티스 서비스에 접속 확인
open <http://localhost:31001>
curl -s localhost:31001 | grep -o "<title>.*</title>"
<title>Welcome to nginx!</title>

# 디플로이먼트와 서비스 삭제
kubectl delete deploy,svc deploy-websrv
[참고] 멀티노드 클러스터 with kube-ops-view & Mapping ports - Window 사용자용
# '컨트롤플레인, 워커 노드 1대' 클러스터 배포 : 파드에 접속하기 위한 포트 맵핑 설정
cat <<EOT> kind-2node.yaml
kind: Cluster
apiVersion: kind.x-k8s.io/v1alpha4
nodes:
- role: control-plane
- role: worker
  extraPortMappings:
  - containerPort: 30000
    hostPort: 30000
    listenAddress: "0.0.0.0" # Optional, defaults to "0.0.0.0"
    protocol: tcp # Optional, defaults to tcp
  - containerPort: 30001
    hostPort: 30001
EOT

kind create cluster --config kind-2node.yaml

# 배포 확인
kind get clusters
kind get nodes

# 노드 확인
kubectl get nodes -o wide

# 노드에 Taints 정보 확인
kubectl describe node kind-control-plane | grep Taints
Taints:             node-role.kubernetes.io/control-plane:NoSchedule

kubectl describe node kind-worker | grep Taints
Taints:             <none>

# 컨테이너 확인 : 컨테이너 갯수, 컨테이너 이름 확인
# kind yaml 에 포트 맵핑 정보 처럼, 자신의 PC 호스트에 30000 포트 접속 시, 워커노드(실제로는 컨테이너)에 TCP 30000 포트로 연결
# 즉, 워커노드에 NodePort TCP 31000 설정 시 자신의 PC 호스트에서 접속 가능!
docker ps
docker port kind-worker
30000/tcp -> 0.0.0.0:30000
30001/tcp -> 0.0.0.0:30001
Mapping ports to the host machine
- kube-ops-view : NodePort 30000
# kube-ops-view
# helm show values geek-cookbook/kube-ops-view
helm repo add geek-cookbook <https://geek-cookbook.github.io/charts/>
helm install kube-ops-view geek-cookbook/kube-ops-view --version 1.2.2 --set service.main.type=NodePort,service.main.ports.http.nodePort=30000 --set env.TZ="Asia/Seoul" --namespace kube-system

# 설치 확인
kubectl get deploy,pod,svc,ep -n kube-system -l app.kubernetes.io/instance=kube-ops-view

# kube-ops-view 접속 URL 확인 (1.5 , 2 배율)
echo -e "KUBE-OPS-VIEW URL = "
http://192.168.50.10:30000/#scale=2 : ubuntu 의 enp0s8(192.168.50.10) vNIC에 TCP 30000(nodeport)로 웹 접속
- nginx : NodePort 30001
- http://192.168.50.10:30001/ : ubuntu 의 enp0s8(192.168.50.10) vNIC에 TCP 30001(nodeport)로 웹 접속
# 디플로이먼트와 서비스 배포
cat <<EOF | kubectl create -f -
apiVersion: apps/v1
kind: Deployment
metadata:
  name: deploy-websrv
spec:
  replicas: 2
  selector:
    matchLabels:
      app: deploy-websrv
  template:
    metadata:
      labels:
        app: deploy-websrv
    spec:
      terminationGracePeriodSeconds: 0
      containers:
      - name: deploy-websrv
        image: nginx:alpine
        ports:
        - containerPort: 80
---
apiVersion: v1
kind: Service
metadata:
  name: deploy-websrv
spec:
  ports:
    - name: svc-webport
      port: 80
      targetPort: 80
      nodePort: 30001
  selector:
    app: deploy-websrv
  type: NodePort
EOF

# 확인
docker ps
CONTAINER ID   IMAGE                  COMMAND                   CREATED         STATUS         PORTS                                  NAMES
117a1145a676   kindest/node:v1.29.2   "/usr/local/bin/entr…"   7 minutes ago   Up 7 minutes   0.0.0.0:30000-30001->30000-30001/tcp   myk8s-worker
...

kubectl get deploy,svc,ep deploy-websrv
...
NAME                    TYPE       CLUSTER-IP      EXTERNAL-IP   PORT(S)        AGE
service/deploy-websrv   NodePort   10.96.204.112   <none>        80:30001/TCP   55s
...

# 자신의 PC에 192.168.50.10:30001 접속 시 쿠버네티스 서비스에 접속 확인
curl -s 192.168.50.10:30001
<title>Welcome to nginx!</title>
...

# 디플로이먼트와 서비스 삭제
kubectl delete deploy,svc deploy-websrv
쿠버네티스 가용성
- 가용성 (Availability) 을 확보하기 위한 다양한 방법
- HPA (Horizontal Pod Autoscaling) : Pod 수평 확장 (스케일 In - Out)
- VPA (Vertical Pod Autoscaling) : Pod 수직 확장 (스케일 Up)
- CA (Cluster Autoscaling) : Node 확장 (Cloud 환경)
구현을 위해서는 Metrics Server 설치가 필요하다. Metrics 지표를 확인하여 HPA, VPA 같은 동작을 수행하도록 한다.
- Metrics Server 설치
- Kubernetes 에 내장된 확장 파이프라인을 위한 컨테이너 지표 수집 서버
- Kubelet 의 지표를 수집하고 노출하여 API Server 에 전달
- HPA, VPA 같은 자동 확장 사용 목적 (모니터링 솔루션 X)
# Metrics Server 설치
kubectl apply -f <https://github.com/kubernetes-sigs/metrics-server/releases/latest/download/components.yaml>

# Metrics Server SSL 무시
kubectl patch deployment metrics-server -n kube-system --type=json \\
  -p='[{"op": "add", "path": "/spec/template/spec/containers/0/args/-", "value": "--kubelet-insecure-tls"}]'

# Metrics Server 배포 확인
kubectl get pods -n kube-system -l k8s-app=metrics-server

# 쿠버네티스 리소스 자원 사용량 확인
kubectl top node
kubectl top pods -A

# CPU, Memory 내림차순
kubectl top pods -A --sort-by=cpu
kubectl top pods -A --sort-by=memory
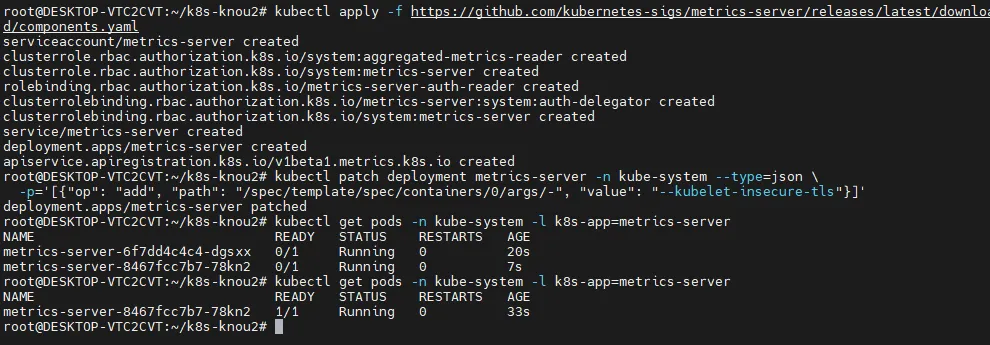
Metrics Server 배포하기
- Metrics Server가 배포되면, top 명령어를 하나 더 칠 수 있다.

정렬 등도 가능하다.
HPA - 수평 스케일링 Horizontal Pod Autoscaling
- HPA는 쿠버네티스를 쓰고 있으면 거의 필수적이다.
- 애플리케이션 부하(Load)에 따라 Pod 개수를 자동으로 늘리거나 줄이는 기능
- 모니터링 대상: CPU, Memory, 사용자 정의 지표
- Metrics Server 가 감시한 지표를 활용하여 설정된 임계치를 초과하면 Replica 수 조정
- 기본 구성
apiVersion: autoscaling/v2
kind: HorizontalPodAutoscaler
metadata:
  name: hpa-sample
spec:
  scaleTargetRef:          # Scale 타겟 지정
    apiVersion: apps/v1
    kind: Deployment
    name: my-app           # Deployment 이름
  minReplicas: 2           # 최소 Pod
  maxReplicas: 10          # 최대 Pod
  metrics:                 # Scale 기준 지표 설정
    - type: Resource
      resource:
        name: cpu
        target:
          type: Utilization
          averageUtilization: 50  # CPU 사용률 50% 기준
    - type: Resource
      resource:
        name: memory
        target:
          type: Utilization
          averageUtilization: 70  # 메모리 사용률 70% 기준
HPA 구성
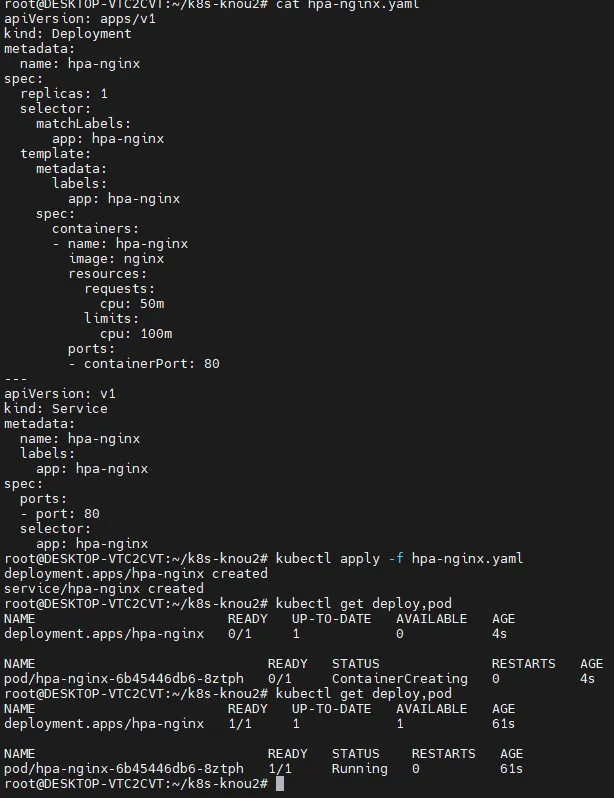
- Deployment 배포
cat << EOF >> hpa-nginx.yaml
apiVersion: apps/v1
kind: Deployment
metadata:
  name: hpa-nginx
spec:
  replicas: 1
  selector:
    matchLabels:
      app: hpa-nginx
  template:
    metadata:
      labels:
        app: hpa-nginx
    spec:
      containers:
      - name: hpa-nginx
        image: nginx
        resources:
          requests:
            cpu: 50m
          limits:
            cpu: 100m
        ports:
        - containerPort: 80
---
apiVersion: v1
kind: Service
metadata:
  name: hpa-nginx
  labels:
    app: hpa-nginx
spec:
  ports:
  - port: 80
  selector:
    app: hpa-nginx
EOF

cat hpa-nginx.yaml

# Deployment 배포
kubectl apply -f hpa-nginx.yaml

kubectl get deploy,pod
- 간단한 nginx 파드
- HPA 구성
# HPA 생성
kubectl autoscale deployment hpa-nginx --cpu-percent=50 --min=1 --max=10
# 퍼센트가 50 이상이면 최소 1개 최대 10개 자동 확장 축소를 해달라

# HPA 확인
kubectl get hpa
...
NAME        REFERENCE              TARGETS       MINPODS   MAXPODS   REPLICAS   AGE
hpa-nginx   Deployment/hpa-nginx   cpu: 0%/50%   1         10        1          17s
....

# HPA 상세 정보 확인
kubectl describe hpa
- HPA를 명령형 커맨드로 바로 실행할 수 있다.
- 위 명령어를 yaml 형태로 뽑아내면 (kubectl get hpa -o yaml | kubectl neat)
apiVersion: autoscaling/v2
kind: HorizontalPodAutoscaler
metadata:
  name: hpa-nginx
spec:
  scaleTargetRef:
    apiVersion: apps/v1
    kind: Deployment
    name: hpa-nginx
  minReplicas: 1
  maxReplicas: 10
  metrics:
  - type: Resource
    resource:
      name: cpu
      target:
        type: Utilization
        averageUtilization: 50

- 부하 발생 전 → 0%
Pod 부하 발생시키기
# 터미널 1번
while true; do kubectl get hpa; kubectl top pods; sleep 1s; done

# 터미널 2번
kubectl run -i --tty load-generator --rm --image=busybox:1.28 --restart=Never -- /bin/sh -c "while true; do wget -q -O- <http://hpa-nginx.default.svc.cluster.local>; done"

# 실습 종료 후 리소스 삭제
kubectl delete hpa --all
kubectl delete -f hpa-nginx.yaml
부하 발생 시 Replicas가 늘어나는 것을 볼 수 있다.

VPA - 수직 스케일링 Vertical Pod Autoscaling
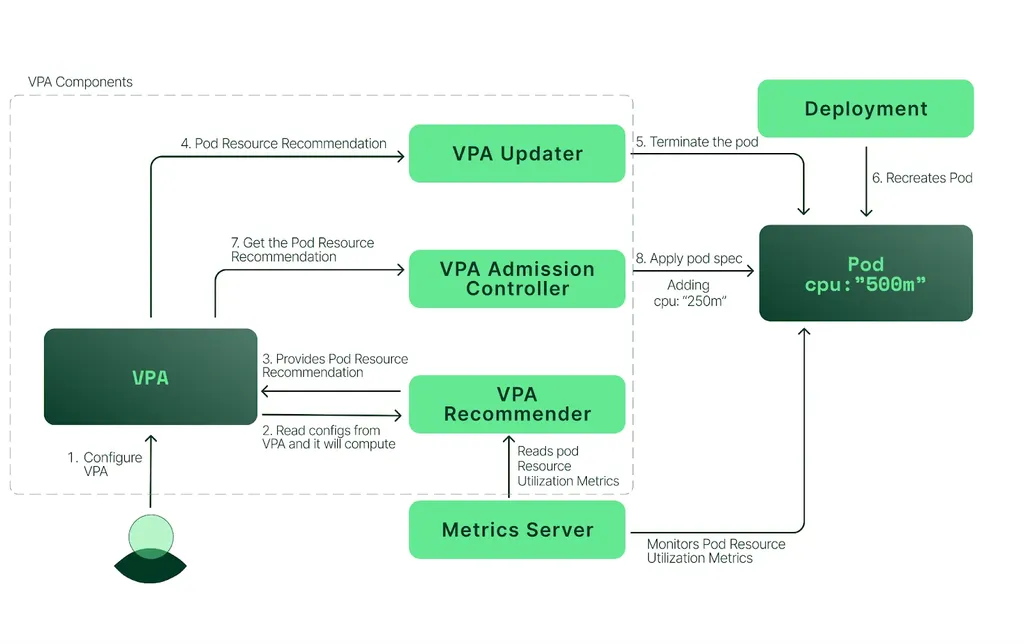
- Pod 의 리소스 요청값(Request)을 자동으로 조정하는 기능
- 적용 대상 : Request (CPU, Memory)
- Pod 의 개수를 늘리는 HPA 와 다르게 Pod 의 리소스 크기를 조정
- VPA Recommender 에 의해 최적의 리소스 상태를 찾아서 조정
- 하나의 Deployment 에 HPA, VPA 를 같이 사용할 수 없음
- (상호간에 충돌하기 때문)
- Kubernetes v1.33 버전 부터는 기본 활성화 상태
- but, kind 는 현재 v1.32 까지만 사용가능하므로 별도 controller 설치 필요
- 기본 구성
apiVersion: autoscaling.k8s.io/v1
kind: VerticalPodAutoscaler
metadata:
  name: my-app-vpa
spec:
  targetRef:                   # Scale 대상
    apiVersion: apps/v1
    kind: Deployment
    name: my-app               # Deployment 명칭
  updatePolicy:
    updateMode: "Auto"         # VPA Recommender 에 의해 자동 조정 활성화
  resourcePolicy:
    containerPolicies:
      - containerName: my-app-container # Container 명칭 "*" 사용 가능
        minAllowed:            # 컨테이너가 할당받을 수 있는 최소 리소스
          cpu: "200m"
          memory: "512Mi"
        maxAllowed:            # 컨테이너가 할당받을 수 있는 최대 리소스
          cpu: "2"
          memory: "2Gi"
- VPA 배포
# EKS Workshop 소스 사용
git clone <https://github.com/kubernetes/autoscaler.git>

# VPA 배포
cd autoscaler/vertical-pod-autoscaler/
./hack/vpa-up.sh

# VPA Controller 확인
kubectl get pods -n kube-system | grep vpa

# VPA 제거
./hack/vpa-down.sh


- VPA 테스트
- 0.1 cpu 를 요청한 2개 Pod 배포 (실제 사용량보다 부족한 상태)
apiVersion: "autoscaling.k8s.io/v1"
kind: VerticalPodAutoscaler
metadata:
  name: hamster-vpa
spec:
  targetRef:
    apiVersion: "apps/v1"
    kind: Deployment
    name: hamster
  resourcePolicy:
    containerPolicies:
      - containerName: '*'
        minAllowed:
          cpu: 100m
          memory: 50Mi
        maxAllowed:
          cpu: 1
          memory: 500Mi
        controlledResources: ["cpu", "memory"]
---
apiVersion: apps/v1
kind: Deployment
metadata:
  name: hamster
spec:
  selector:
    matchLabels:
      app: hamster
  replicas: 2
  template:
    metadata:
      labels:
        app: hamster
    spec:
      securityContext:
        runAsNonRoot: true
        runAsUser: 65534 # nobody
      containers:
        - name: hamster
          image: registry.k8s.io/ubuntu-slim:0.14
          resources:
            requests:
              cpu: 100m
              memory: 50Mi
          command: ["/bin/sh"]
          args:
            - "-c"
            - "while true; do timeout 0.5s yes >/dev/null; sleep 0.5s; done"
# 터미널 1번
while true;
 do date "+%Y-%m-%d %H:%m:%S";
 kubectl get pod -l app=hamster;
 kubectl get vpa;
 kubectl describe pod | grep "Requests:" -A2;
 echo "==============";
 sleep 5s;
done

# 터미널 2번
kubectl apply -f examples/hamster.yaml

# 자원 삭제
kubectl delete -f examples/hamster.yaml

Pod 재시작 없이 Resize - kind feature gate (InPlacePodVerticalScaling) 설정 필요
- kubernetes v1.27 ~v1.32 까지 feature gate 활성화 시 사용 가능
- kubernetes v1.33 부터는 기본 활성화
apiVersion: v1
kind: Pod
metadata:
  name: resize-demo
spec:
  containers:
  - name: pause
    image: registry.k8s.io/pause:3.8
    resizePolicy:
    - resourceName: cpu
      restartPolicy: NotRequired # Default, but explicit here
    - resourceName: memory
      restartPolicy: RestartContainer
    resources:
      limits:
        memory: "200Mi"
        cpu: "700m"
      requests:
        memory: "200Mi"
        cpu: "700m"
# 터미널 1번
while true;
 do date "+%Y-%m-%d %H:%m:%S";
 kubectl get pod;
 kubectl get vpa;
 kubectl describe pod | grep "Requests:" -A2;
 echo "==============";
 sleep 5s;
done

# 터미널 2번
kubectl apply -f vpa.yaml
kubectl patch pod resize-demo --subresource resize --patch \\
  '{"spec":{"containers":[{"name":"pause", "resources":{"requests":{"cpu":"800m"}, "limits":{"cpu":"800m"}}}]}}'

# 자원 삭제
kubectl delete -f vpa.yaml
CA (Cluster Autoscaler)
- Cluster Autoscaler
- 쿠버네티스 클러스터에서 노드 수를 자동으로 확장, 축소하는 도구
- HPA, VPA 는 Pod 단에서의 동작이지만, CA 는 워커 노드 단에서의 동작
- 클라우드 환경에서 사용되며 파드를 배포할 노드의 리소스가 부족해지면 노드를 자동으로 확장
- Karpenter
- CA 와 동일하게 쿠버네티스 노드 수를 자동으로 확장, 축소하는 도구
- CA 와는 다르게 Node 의 크기까지 자동으로 변경 (HPA + VPA 기능)
- CA 에 비해 노드의 빠른 확장 및 축소 가능
KEDA
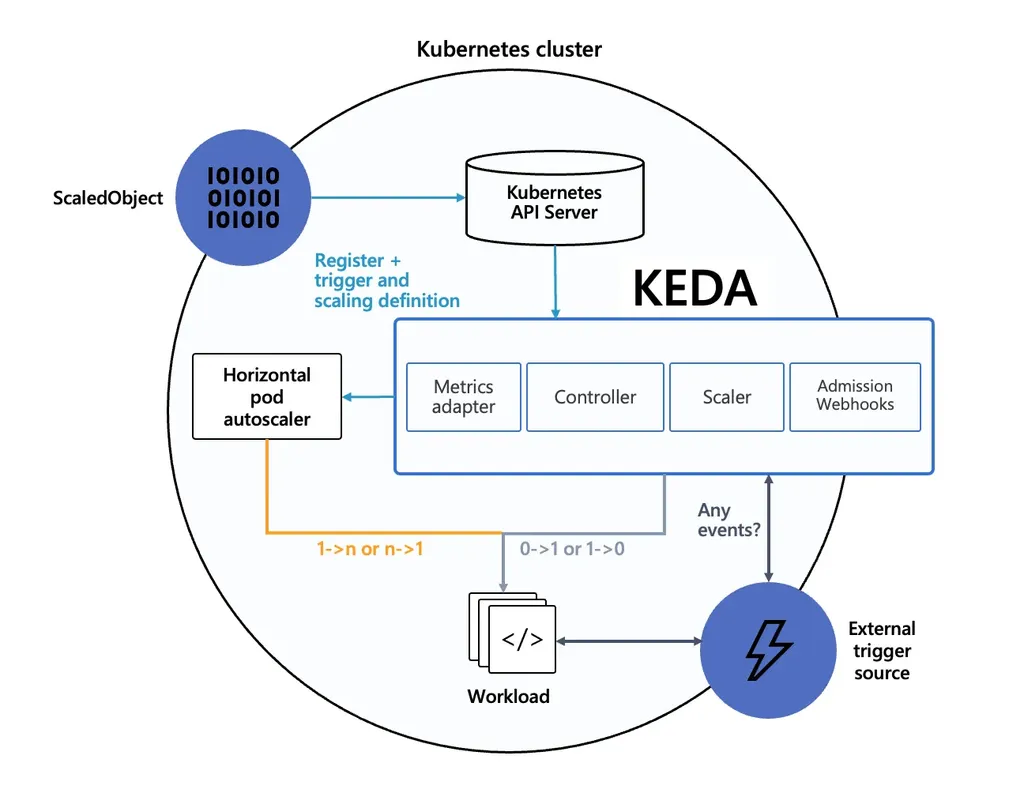
- KEDA (Kubernetes Event-Driven Autoscaler)
- 기존 HPA(Horizontal Pod Autoscaler)는 리소스(CPU, Memory) 메트릭 기반 스케일링
- KEDA 는 이벤트 기반의 Autoscaler
- HPA 와 함께 사용하여 이벤트 기반으로 유연하게 확장 가능
- ex) 특정 시간대에 미리 확장
어플리케이션 변수 관리
ConfigMap

- Kubernetes 애플리케이션의 구성 파일이나 환경 설정을 Key-Value 형태로 저장하고 관리
- 애플리케이션의 설정 정보를 외부에서 관리하고 Pod 와 컨테이너에서 참조
- 주요 사용 용도
- 애플리케이션 설정 관리
- 애플리케이션 구성 정보 (DB URL, 변수 등)을 ConfigMap 에 저장하여 Pod 환경 변수나 파일로 사용
- 애플리케이션 환경에 맞는 설정 값 변경
- 애플리케이션을 재빌드 하지 않고 설정 값 변경
- DEV, STG, PRD 환경에 따라 각각 다른 파일 구성으로 관리 목적
- 애플리케이션 설정 관리
- 기본 구성
# ConfigMap 샘플 구성
apiVersion: v1
kind: ConfigMap
metadata:
  name: my-config # ConfigMap 명칭
data:
  key1: value1    # Key : Value 형태 값 주입
  key2: value2
# ConfigMap 사용 예시
apiVersion: v1
kind: Pod
metadata:
  name: my-app
spec:
  containers:
    - name: my-container
      image: my-image
      env:
        - name: MY_CONFIG_KEY  # 컨테이너에서 사용할 변수 Key 값
          valueFrom:
            configMapKeyRef:
              name: my-config  # 사용할 ConfigMap의 이름
              key: key1        # ConfigMap 내의 키 -> 값: value1
ConfigMap 기본 활용
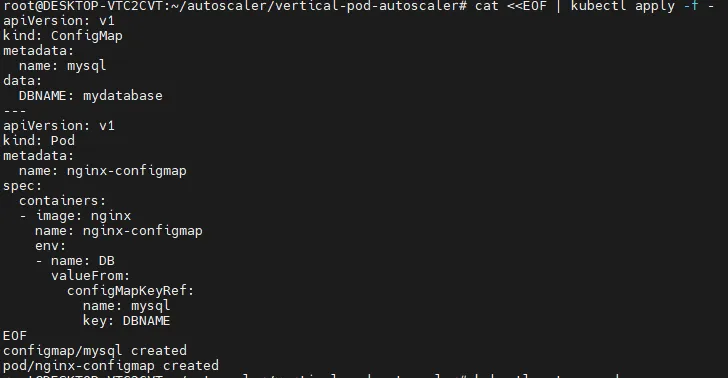
cat <<EOF | kubectl apply -f -
apiVersion: v1
kind: ConfigMap
metadata:
  name: mysql
data:
  DBNAME: mydatabase
---
apiVersion: v1
kind: Pod
metadata:
  name: nginx-configmap
spec:
  containers:
  - image: nginx
    name: nginx-configmap
    env:
    - name: DB
      valueFrom:
        configMapKeyRef:
          name: mysql
          key: DBNAME
EOF

# 오브젝트 확인
kubectl get cm,pod

# 상세 정보 조회
kubectl describe cm mysql
kubectl describe pod nginx-configmap

# pod 내부 변수 확인
kubectl exec -it nginx-configmap -- /bin/bash -c env
...
DB=mydatabase
...

# 리소스 삭제
kubectl delete pod --all
kubectl delete cm nginx-configmap

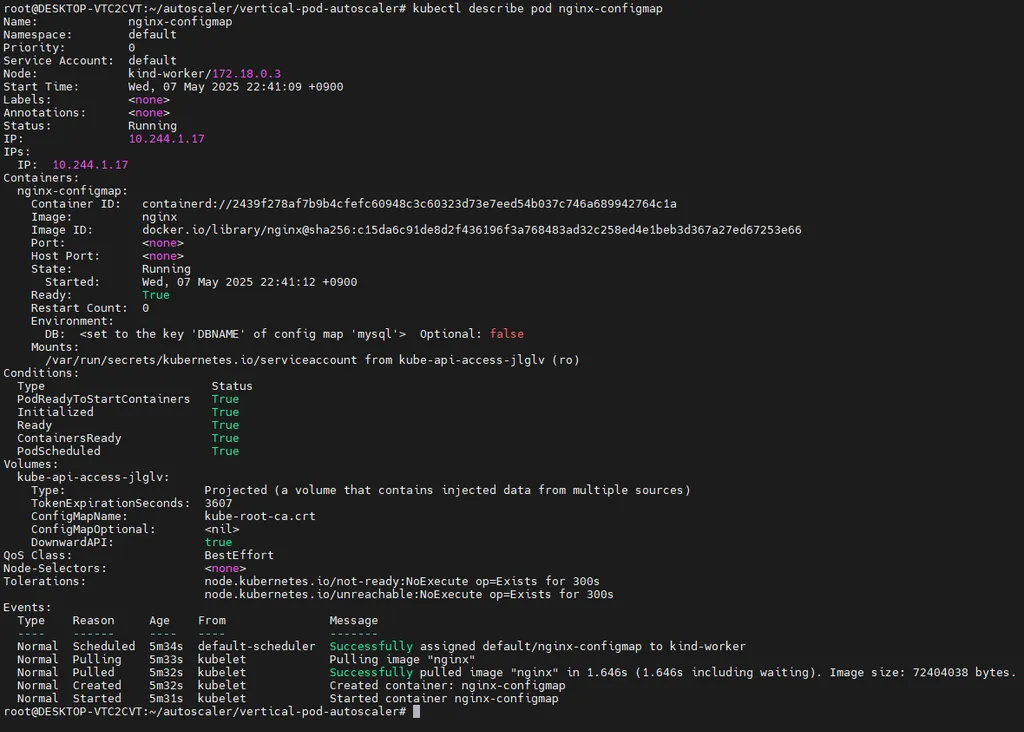

- 변수명에서 DB라는 변수를 찾아볼 수 있다.
ConfigMap 으로 설정 파일 관리
# 테스트 파일 생성
cat << EOF >> config-deploy.yaml
apiVersion: apps/v1
kind: Deployment
metadata:
  name: nginx-configmap-deploy
spec:
  replicas: 2
  selector:
    matchLabels:
      app: nginx-configmap
  template:
    metadata:
      labels:
        app: nginx-configmap
    spec:
      containers:
      - name: nginx
        image: nginx
        ports:
        - containerPort: 80
        volumeMounts:
        - name: config-volume
          mountPath: /etc/nginx/nginx.conf
          subPath: nginx.conf
      volumes:
      - name: config-volume
        configMap:
          name: nginx-config
---
apiVersion: v1
kind: Service
metadata:
  name: nginx-service
spec:
  selector:
    app: nginx-configmap
  ports:
    - protocol: TCP
      port: 80
      targetPort: 80
      nodePort: 31001
  type: NodePort
EOF

cat << EOF >> configmap.yaml
apiVersion: v1
kind: ConfigMap
metadata:
  name: nginx-config
data:
  nginx.conf: |
    events {}
    http {
        server {
            listen 80;
            location / {
                return 200 'Hello from nginx configmap!';
            }
        }
    }
EOF
- 리소스 배포
kubectl apply -f configmap.yaml -f config-deploy.yaml

#
kubectl get cm,deploy,pod
kubectl describe deploy
...
    Mounts:
      /etc/nginx/nginx.conf from config-volume (rw,path="nginx.conf")
  Volumes:
   config-volume:
    Type:          ConfigMap (a volume populated by a ConfigMap)
    Name:          nginx-config
    Optional:      false
...

# Nginx 접속
open <http://localhost:31001>

# Nginx ConfigMap 변경
vim configmap.yaml
...
return 200 'Modify from nginx configmap!';
...

#
kubectl apply -f configmap.yaml

# pod 재시작
kubectl rollout restart deploy nginx-configmap-deploy

# 리소스 삭제
kubectl delete -f configmap.yaml -f config-deploy.yaml
- configMap 내용을 바꿔도, 다시 배포가 되지 않으면 내용이 바뀌지 않음 → pod 재시작 필요
- configMap을 수정한 부분이 pod에도 잘 적용이 됨을 확인할 수 있다.
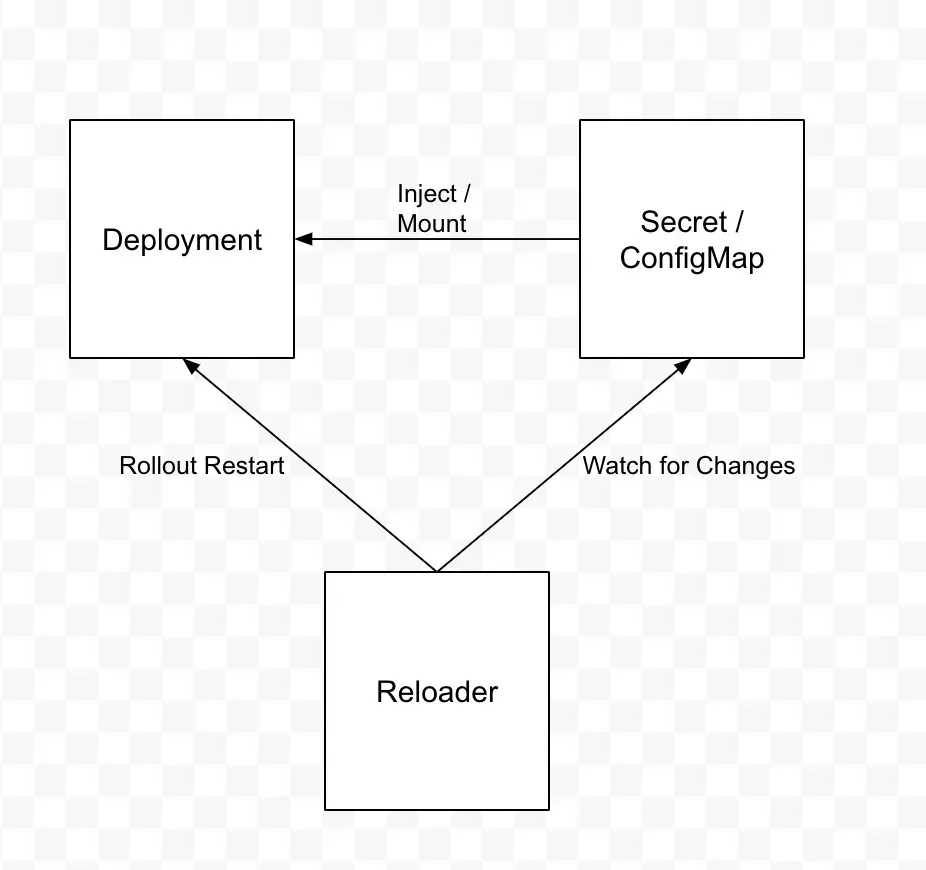
- 참고) Reloader
- ConfigMap 변경 시 Pod 수동 재배포가 필요 → 비효율적
- ConfigMap, Secret 의 변동 사항을 주기적으로 확인해서 자동으로 Rollout 을 해주는 오픈소스 도구
Secret
- Kubernetes 에서 민감 정보를 안전하게 관리하는 객체 (비밀번호, 토큰, SSH 키 등)
- ConfigMap 과 달리 Base64 로 인코딩된 형태로 데이터 저장
- Base64는 단순히 인코딩(encoding) 방식. 암호화가 아님.
- → Base64 는 암호화인가??
- Secret 파일에 Base64 로 인코딩된 값이 아니면 사용할 수 없음
- 주요 사용 용도
- 비밀번호, API 키 등의 민감정보 저장
- ConfigMap 과 동일하게 Pod 의 환경 변수나 파일로 주입 가능
- 기본 구성
# Secret 샘플
apiVersion: v1
kind: Secret
metadata:
  name: my-secret
type: Opaque
data:
  username: bXl1c2Vy  # base64로 인코딩된 값
  password: bXlwYXNzd29yZA==  # base64로 인코딩된 값
# Secret 사용 예시
apiVersion: v1
kind: Pod
metadata:
  name: my-app
spec:
  containers:
    - name: my-container
      image: my-image
      env:
        - name: DB_USER        # Container 에서 사용할 변수명
          valueFrom:
            secretKeyRef:
              name: my-secret  # 사용할 Secret의 이름
              key: username    # Secret 내의 키
        - name: DB_PASSWORD
          valueFrom:
            secretKeyRef:
              name: my-secret  # 사용할 Secret의 이름
              key: password    # Secret 내의 키
...
# 마운트 방법
      volumeMounts:
        - name: secret-volume     # Volume 명칭
          mountPath: /etc/secrets # 컨테이너 내부 마운트 위치
  volumes:
    - name: secret-volume         # Volume 명칭
      secret:
        secretName: my-secret     # 사용할 Secret의 이름
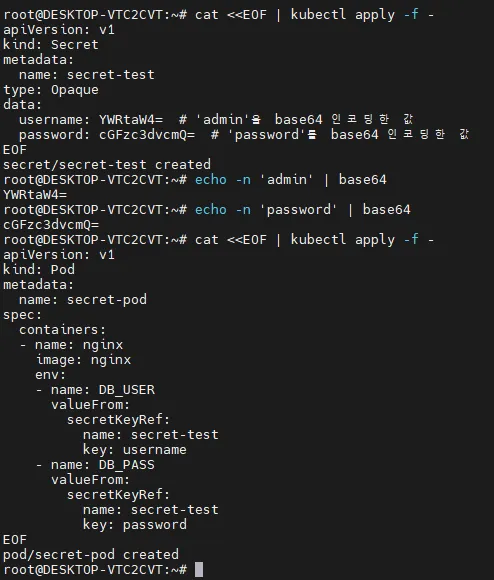
Secret 기본 활용
cat <<EOF | kubectl apply -f -
apiVersion: v1
kind: Secret
metadata:
name: secret-test
type: Opaque
data:
username: YWRtaW4= # 'admin'을 base64 인코딩한 값
password: cGFzc3dvcmQ= # 'password'를 base64 인코딩한 값
EOF
# Base64 인코딩 방법
echo -n 'admin' | base64
echo -n 'password' | base64
#
cat <<EOF | kubectl apply -f -
apiVersion: v1
kind: Pod
metadata:
name: secret-pod
spec:
containers:
- name: nginx
image: nginx
env:
- name: DB_USER
valueFrom:
secretKeyRef:
name: secret-test
key: username
- name: DB_PASS
valueFrom:
secretKeyRef:
name: secret-test
key: password
EOF
#
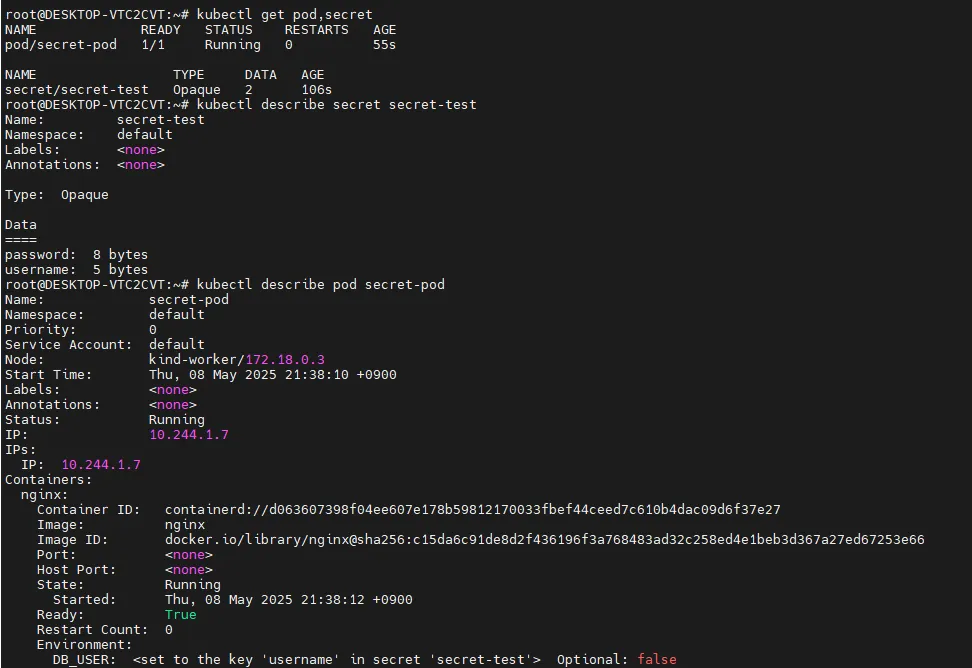
kubectl get pod,secret
# 상세 정보 조회
kubectl describe secret secret-test
kubectl describe pod secret-pod
# pod 내부 변수 확인
kubectl exec -it secret-pod -- /bin/bash -c env
...
DB_USER=admin
DB_PASS=password
...
# 리소스 삭제
kubectl delete pod --all
kubectl delete secret secret-test

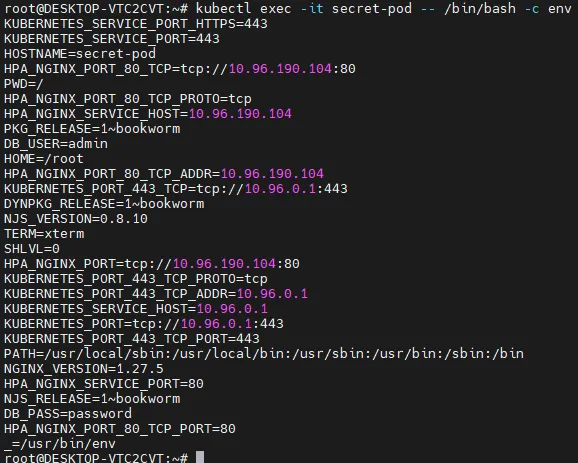
- secret 값을 바로 조회했을 때는 나오지 않지만, pod에 mount 할 때는 api 서버를 통해서 값을 가져오기 때문에 이미 복호화가 되어있다.
- Secret 을 관리하는 다양한 도구
- ASCP (AWS Secret Store CSI Driver) - AWS Secret Manager 활용
- HashiCorp Vault
- Sealed Secret - OSS
참고) Sealed Secret
K8S Secret 을 암호화할 수 있는 OSS 도구
- 기존 Base64 로 인코딩 되어 저장하는 Secret 이 아닌 암호화 되어 저장
- Code Repository (Git) 에 암호화된 Secret 이 올라가기 때문에, GitOps Flow 를 그대로 사용할 수 있는 장점이 있음
- Client Side(암호화) - Server Side (복호화)
# Mac Brew 설치 (Client-Side)
brew install kubeseal

# Server-Side 설치 - SealedSecret Controller
helm repo add sealed-secrets <https://bitnami-labs.github.io/sealed-secrets>
helm install my-release sealed-secrets/sealed-secrets

# SealedSecret Controller 조회
kubectl get pods -l app.kubernetes.io/name=sealed-secrets

# Secret 생성
kubectl create secret generic mysecret \\
  --from-literal hello=world \\
  --dry-run=client \\
  -o yaml > mysecret.yaml

#
cat mysecret.yaml

# base64 디코딩
grep 'hello:' mysecret.yaml | awk '{print $2}' | base64 --decode

# Sealed Secret 생성
cat mysecret.yaml | \\
  kubeseal \\
   --controller-name my-release-sealed-secrets \\
   --controller-namespace default -o yaml > mysealed-secret.yaml

# Sealed Secret 암호화 적용 확인
cat mysealed-secret.yaml
grep 'hello:' mysealed-secret.yaml | awk '{print $2}' | base64 --decode

#
kubectl apply -f mysealed-secret.yaml
kubectl get secret

# secret 확인
kubectl get secret mysecret -o json
kubectl get secret mysecret -o jsonpath="{.data.hello}" | base64 -d
네트워크
서비스 종류
- Service -
- 외부와 접하는 단일 엔드포인트
- 서비스 뒷단의 애플리케이션으로 외부 트래픽을 전송
- ClusterIP
- 쿠버네티스 클러스터 범위의 가상 IP 부여
- 클러스터 내부에서만 ClusterIP 로 접근 가능
- 서비스 타입을 지정하지 않을 경우 기본값
- NodePort
- 고정 포트로 각 노드(Host) 의 포트를 노출
- 클러스터 외부에서 노드(Host) 의 IP:Port 를 통해 접근 가능
- LoadBalancer
- 외부 로드 밸런서를 지원하는 클라우드 공급자 상에서 활용
- AWS, Azure, GCP 등의 LB 서비스와 쿠버네티스 서비스를 연결
ClusterIP

테스트 환경 배포
# 어플리케이션 배포
cat << EOF >> cluster-pod.yaml
apiVersion: v1
kind: Pod
metadata:
  name: cluster-pod-1
  labels:
    app: cluster-pod
spec:
  containers:
  - name: container
    image: traefik/whoami
---
apiVersion: v1
kind: Pod
metadata:
  name: cluster-pod-2
  labels:
    app: cluster-pod
spec:
  containers:
  - name: container
    image: traefik/whoami
EOF

# Test 파드
cat << EOF >> netshoot-pod.yaml
apiVersion: v1
kind: Pod
metadata:
  name: netshoot-pod
spec:
  containers:
  - name: netshoot-pod
    image: nicolaka/netshoot
    command: ["tail"]
    args: ["-f", "/dev/null"]
EOF

# ClusterIP 서비스 생성
cat <<EOF>> cluster-svc.yaml
apiVersion: v1
kind: Service
metadata:
  name: cluster-svc
spec:
  type: ClusterIP
  selector:
    app: cluster-pod
  ports:
    - name: cluster
      port: 8080 # service의 포트
      targetPort: 80 # service가 pod를 호출할 때의 포트
EOF

# 배포
kubectl apply -f cluster-pod.yaml -f cluster-svc.yaml -f netshoot-pod.yaml
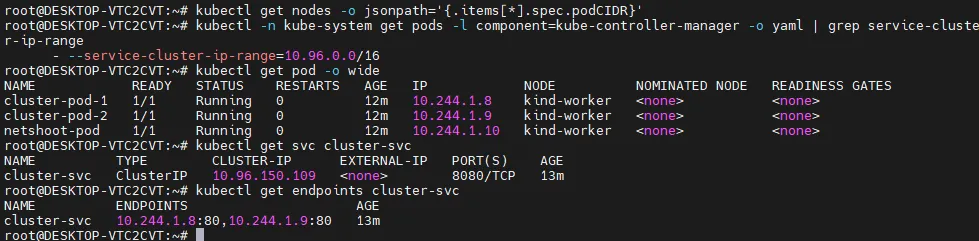
- service로 진입했을 때, pod의 로드밸런싱이 어떻게 되는지 확인하기 위해 2개를 배포함

Pod 생성 확인
# 파드 대역 확인
kubectl get nodes -o jsonpath='{.items[*].spec.podCIDR}'
...
10.244.0.0/24 10.244.1.0/24
...

# SVC 대역 확인
kubectl -n kube-system get pods -l component=kube-controller-manager -o yaml | grep service-cluster-ip-range
...
--service-cluster-ip-range=10.96.0.0/16
...

# 확인
kubectl get pod -o wide
...
NAME                                         READY   STATUS    RESTARTS   AGE     IP            NODE          NOMINATED NODE   READINESS GATES
cluster-pod-1                                1/1     Running   0          8m20s   10.244.1.66   kind-worker   <none>           <none>
cluster-pod-2                                1/1     Running   0          8m20s   10.244.1.65   kind-worker   <none>           <none>
netshoot-pod                                 1/1     Running   0          8m20s   10.244.1.67   kind-worker   <none>           <none>
...

# 서비스 확인
kubectl get svc cluster-svc
...
NAME          TYPE        CLUSTER-IP      EXTERNAL-IP   PORT(S)    AGE
cluster-svc   ClusterIP   10.96.138.114   <none>        8080/TCP   9m18s
...

# Endpoint 확인 (Pod IP:Port)
kubectl get endpoints cluster-svc
...
NAME                                ENDPOINTS                       AGE
cluster-svc                         10.244.1.65:80,10.244.1.66:80   9m37s
...
ClusterIP 확인
# 클라이언트(TestPod) Shell 실행
kubectl exec -it netshoot-pod -- zsh

# 서비스 ClusterIP 주입
SVC=10.96.138.114

curl $SVC:8080
curl -s $SVC:8080 | grep Hostname

# 100 번 반복 호출
for i in {1..100}; do curl -s $SVC:8080 | grep Hostname; done | sort | uniq -c | sort -nr
...
55 Hostname: cluster-pod-1
45 Hostname: cluster-pod-2
...
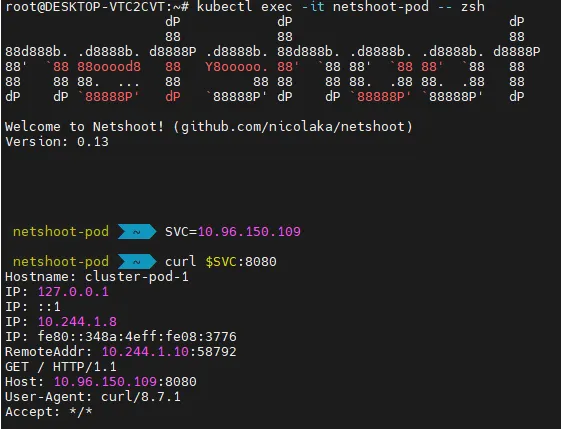
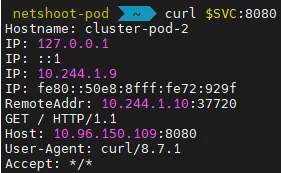
이런 식으로 service는 application의 단일 진입점이 된다.

완벽하게 라운드로빈 되지는 않는다. (심화 설정 필요)
NodePort

테스트 환경 배포
# 어플리케이션 배포
cat << EOF > nodeport-pod.yaml
apiVersion: apps/v1
kind: Deployment
metadata:
  name: nodeport-deploy
spec:
  replicas: 2
  selector:
    matchLabels:
      app: nodeport-deploy
  template:
    metadata:
      labels:
        app: nodeport-deploy
    spec:
      containers:
      - name: container
        image: traefik/whoami
EOF

# ClusterIP 서비스 생성
cat <<EOF> nodeport-svc.yaml
apiVersion: v1
kind: Service
metadata:
  name: nodeport-svc
spec:
  type: NodePort
  selector:
    app: nodeport-deploy
  ports:
    - name: nodeport-svc
      port: 80          # 서비스 포트 (Cluster 내부에서 사용)
      targetPort: 80    # 실제 컨테이너 포트
      nodePort: 31001   # 외부에서 접근할 NodePort
EOF
생성 및 확인
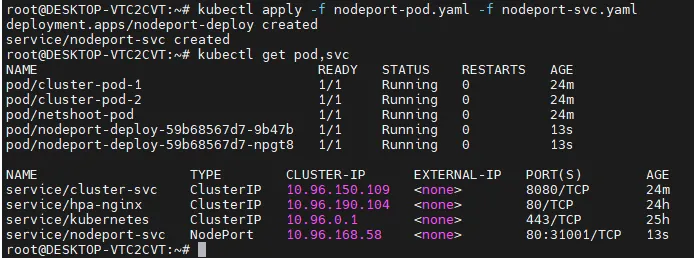
# 생성
kubectl apply -f nodeport-pod.yaml -f nodeport-svc.yaml

# 확인
kubectl get pod,svc
...
NAME                   TYPE        CLUSTER-IP     EXTERNAL-IP   PORT(S)        AGE
service/nodeport-svc   NodePort    10.96.66.182   <none>        80:31001/TCP   100s
...

kubectl get endpoints nodeport-svc
NAME           ENDPOINTS                       AGE
nodeport-svc   10.244.1.10:80,10.244.1.11:80   2m50s

NodePort 동작 확인
# 노드의 Port 로 curl 요청
curl <http://localhost:31001>
curl -s <http://localhost:31001> | grep Hostname

# 100 번 반복 호출
for i in {1..100}; do curl -s <http://localhost:31001> | grep Hostname; done | sort | uniq -c | sort -nr
...
58 Hostname: nodeport-deploy-59b68567d7-6h562
42 Hostname: nodeport-deploy-59b68567d7-k2cpb
...
- nodePort는 좋지 않다 → Ingress를 많이 쓴다.
Ingress
- Ingress는 Service 위에 있다.
- Ingress가 도메인 url path를 읽고 어떤 service로 트래픽을 흘러줄지, 라우팅 역할을 한다.

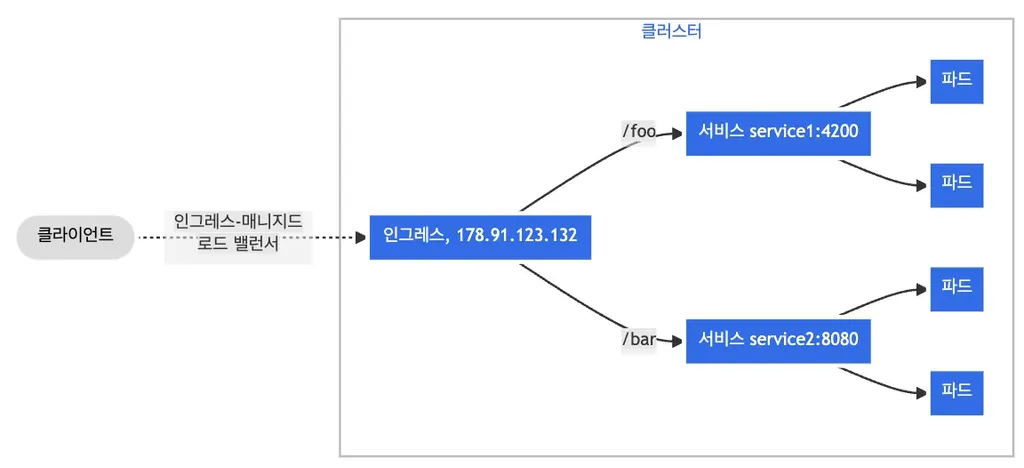
- 클러스터 외부에서 내부 서비스로 트래픽을 라우팅 하는 방법을 제공하는 리소스
- 클러스터 내부 서비스 (ClusterIP, NodePort, LoadBalancer) 를 외부로 노출 (HTTP / HTTPS) - Web Proxy 역할
- Ingress 를 사용하기 위해서는 Ingress Controller 가 필요
- 대표적인 Ingress Controller
- Nginx Ingress Controller
- Cloud Provider Ingress Controllers
- (ex. AWS ALB Ingress Controller, GCP Ingress Controller)
- 주요 기능
- 호스트 기반 라우팅
- 호스트 이름 (도메인)을 기반으로 트래픽 라우팅 가능
- api.example.com / www.example.com 을 각각 다른 Service 리소스와 연결
- 경로 기반 라우팅
- 요청 경로 기반으로 트래픽 라우팅 가능
- /growth , /log 경로를 각각 다른 Service 리소스와 연결
- TLS 설정
- TLS 인증서를 활용하여 HTTPS 구성 가능
- 로드 밸런싱
- 내부 서비스에 대한 로드 밸런싱
- 호스트 기반 라우팅
- 기본 구성
apiVersion: networking.k8s.io/v1
kind: Ingress
metadata:
  name: example-ingress
  namespace: default
spec:
  rules:
  - host: example.com       # Domain Host
    http:
      paths:
      - path: /service1     # URL Path (example.com/service1)
        pathType: Prefix
        backend:
          service:
            name: service1  # /service1 로 들어온 트래픽을 전송할 service 명
            port:
              number: 80
      - path: /service2     # URL Path (example.com/service2)
        pathType: Prefix
        backend:
          service:
            name: service2
            port:
              number: 80    # /service2 로 들어온 트래픽을 전송할 service 명
Nginx Ingress Controller 설치
- Ingress Controller 중 가장 대중적인 도구
- Ingress 리소스 및 동작 방식을 구현
# 기존 리소스 삭제
kind delete cluster
# kind cluster 재배포
kind create cluster --config kind-2node.yaml
# Nginx Ingress Controller 설치
kubectl apply -f <https://raw.githubusercontent.com/kubernetes/ingress-nginx/main/deploy/static/provider/cloud/deploy.yaml>
# Service 타입 변경
kubectl patch svc ingress-nginx-controller -n ingress-nginx -p \\
'{"spec":{"type":"NodePort","ports":[{"port":80,"targetPort":80,"nodePort":31000},{"port":443,"targetPort":443,"nodePort":31001}]}}'
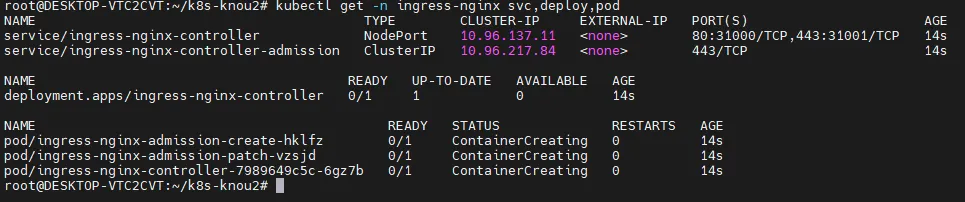
# Nginx Ingress Controller 리소스 확인
kubectl get -n ingress-nginx svc,deploy,pod
서비스 생성
# Growth 서비스
cat << EOF > svc-growth.yaml
apiVersion: v1
kind: Service
metadata:
  name: growth-service
spec:
  selector:
    app: growth
  ports:
    - protocol: TCP
      port: 80
      targetPort: 80
---
apiVersion: apps/v1
kind: Deployment
metadata:
  name: growth-deployment
spec:
  replicas: 1
  selector:
    matchLabels:
      app: growth
  template:
    metadata:
      labels:
        app: growth
    spec:
      containers:
        - name: nginx
          image: nginx
          ports:
            - containerPort: 80
          volumeMounts:
            - name: growth-html
              mountPath: /usr/share/nginx/html
      volumes:
        - name: growth-html
          configMap:
            name: growth-html
---
apiVersion: v1
kind: ConfigMap
metadata:
  name: growth-html
data:
  index.html: |
    <html>
    <body>
      <h1>hello growth</h1>
    </body>
    </html>
EOF

kubectl apply -f svc-growth.yaml

# Log 서비스
cat << EOF > svc-log.yaml
apiVersion: v1
kind: Service
metadata:
  name: log-service
spec:
  selector:
    app: log
  ports:
    - protocol: TCP
      port: 80
      targetPort: 80
---
apiVersion: apps/v1
kind: Deployment
metadata:
  name: log-deployment
spec:
  replicas: 1
  selector:
    matchLabels:
      app: log
  template:
    metadata:
      labels:
        app: log
    spec:
      containers:
        - name: nginx
          image: nginx
          ports:
            - containerPort: 80
          volumeMounts:
            - name: log-html
              mountPath: /usr/share/nginx/html
      volumes:
        - name: log-html
          configMap:
            name: log-html
---
apiVersion: v1
kind: ConfigMap
metadata:
  name: log-html
data:
  index.html: |
    <html>
    <body>
      <h1>hello log</h1>
    </body>
    </html>

EOF

kubectl apply -f svc-log.yaml

# 배포 확인
kubectl get pod,svc,cm

# ConfigMap 확인
kubectl describe cm growth-html
kubectl describe cm log-html

Ingress 배포
cat << EOF > ingress-sample.yaml
apiVersion: networking.k8s.io/v1
kind: Ingress
metadata:
  name: growth-log-ingress
  annotations:
    nginx.ingress.kubernetes.io/rewrite-target: / # /growth, /log 요청을 서비스로 전달할 때 접두사 제거. ex) /growth -> growth-service '/'
spec:
  ingressClassName: nginx
  rules:
  - http:
      paths:
      - path: /growth
        pathType: Prefix
        backend:
          service:
            name: growth-service
            port:
              number: 80
      - path: /log
        pathType: Prefix
        backend:
          service:
            name: log-service
            port:
              number: 80
EOF

kubectl apply -f ingress-sample.yaml
kubectl get ing,svc

#
kubectl describe ingress growth-log-ingress

Ingress 동작 확인
# growth 경로 호출
curl <http://localhost:31000/growth>
...
<html>
<body>
  <h1>hello growth</h1>
</body>
</html>
...

# Log 경로 호출
curl <http://localhost:31000/log>
...
<html>
<body>
  <h1>hello log</h1>
</body>
</html>
...
Storage
Kubernetes Storage 소개
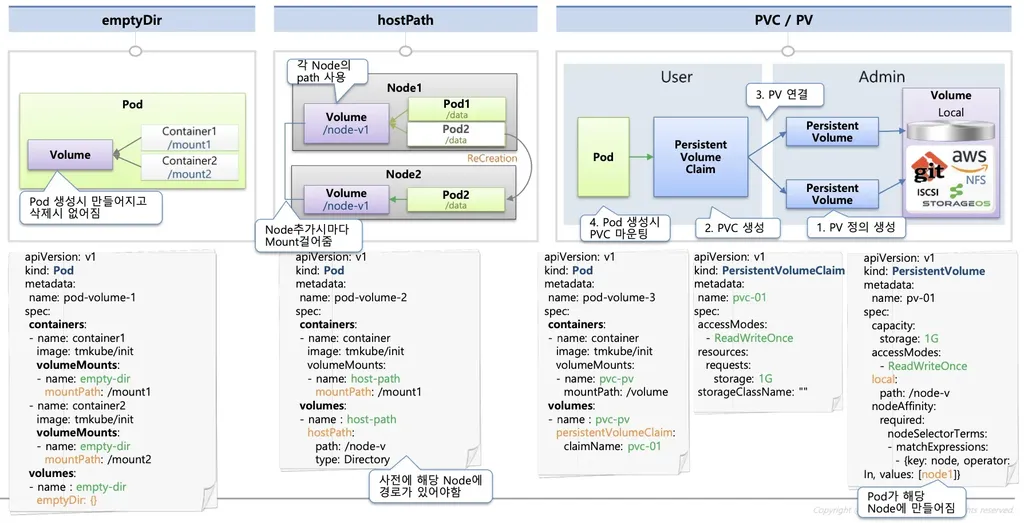
- emptyDir
- Pod 내부에 존재하며 동일한 Pod 의 컨테이너 간 공유될 수 있는 스토리지
- Pod 삭제 시 함께 삭제
- Container 가 사용하는 임시 저장소
- hostPath
- Pod 가 배포된 Worker Node 의 Directory Path 를 Pod 에 마운트
- Pod 가 삭제되어도 데이터는 Worker Node 에 존재
- 하지만 해당 Pod 가 배포된 Node 에만 데이터를 저장하므로, 다른 노드에 배포된 파드와는 공유할 수 없음
- Persistent volume (PV)
- 쿠버네티스 클러스터 전체의 공유 볼륨
- 다양한 크기의 볼륨을 가진 PV 를 미리 만들어 두고 Pod 가 필요할 때 연결하여 사용
- 이 때, Pod 와 PV 를 연결하는 작업이 PVC(PersistentVolumeClaim)
'Docker & Kubernetes' 카테고리의 다른 글
| 도커 & 쿠버네티스 스터디 4주차 - Kubernetes Probe & GitOps 개요 (2) | 2025.05.18 |
|---|---|
| 도커 & 쿠버네티스 스터디 2주차 - Kubernetes 소개 & Kubernetes 기본 활용 (0) | 2025.04.26 |
| 도커 & 쿠버네티스 스터디 1주차 : Docker 소개 & Docker 활용 (0) | 2025.04.19 |


